Register and Trade on LiteFinance: Forex Account Setup & Trading

Below you’ll find a practical workflow for registering a LiteFinance trading account, completing identity verification, funding the account via supported payment options, and placing your first FX trades on the broker’s platforms. The steps cover choosing the right account type, preparing ID and proof-of-address files, verifying contact details, selecting a deposit route, connecting to the trading terminal or mobile app, testing on demo, placing market or limit orders, and basic stop-loss and position-sizing practices to manage risk.

How to Register on LiteFinance
How to Register LiteFinance Account on the Web app
How to Register an account
First, you’ll need to enter the LiteFinance homepage. After that, on the homepage, click the "Registration" button in the upper right corner of the screen.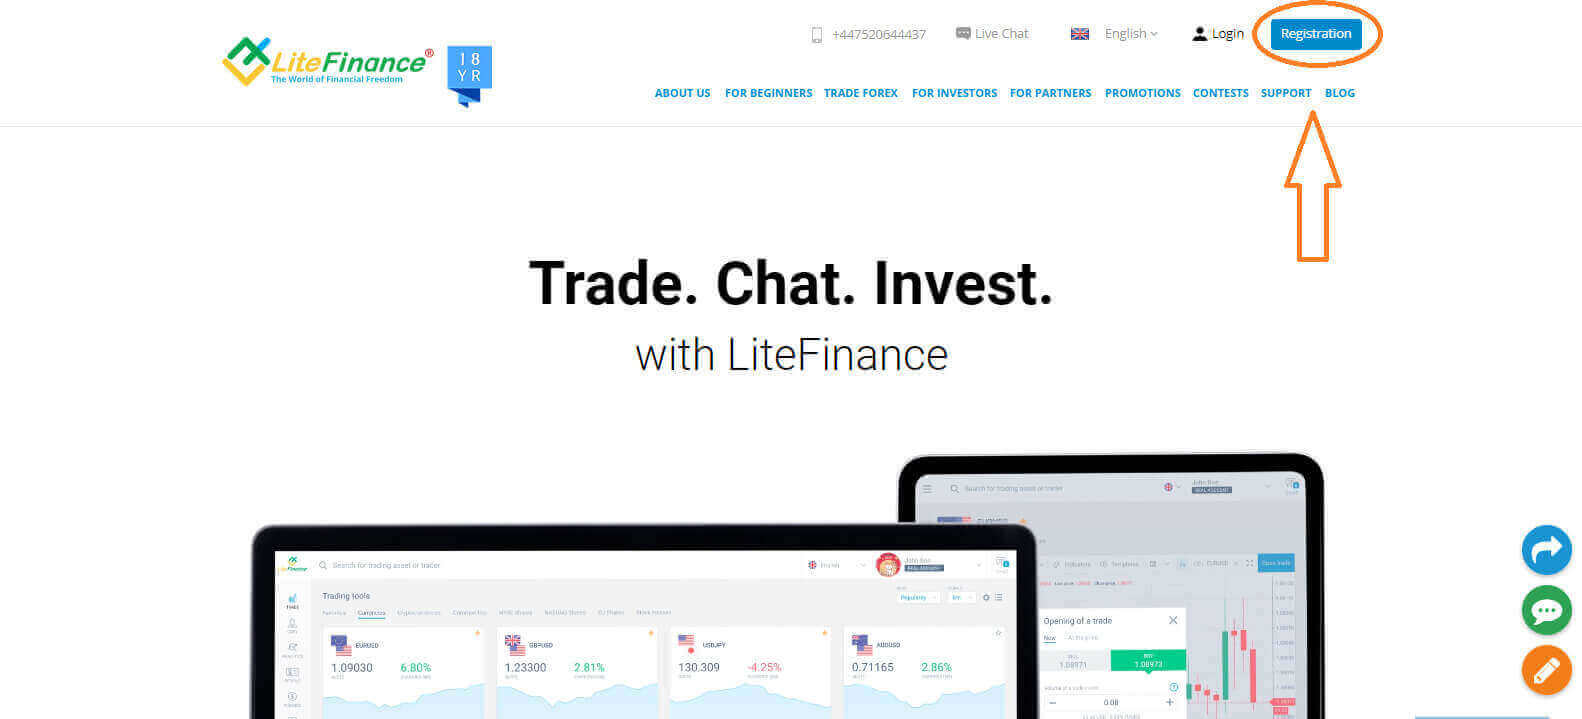
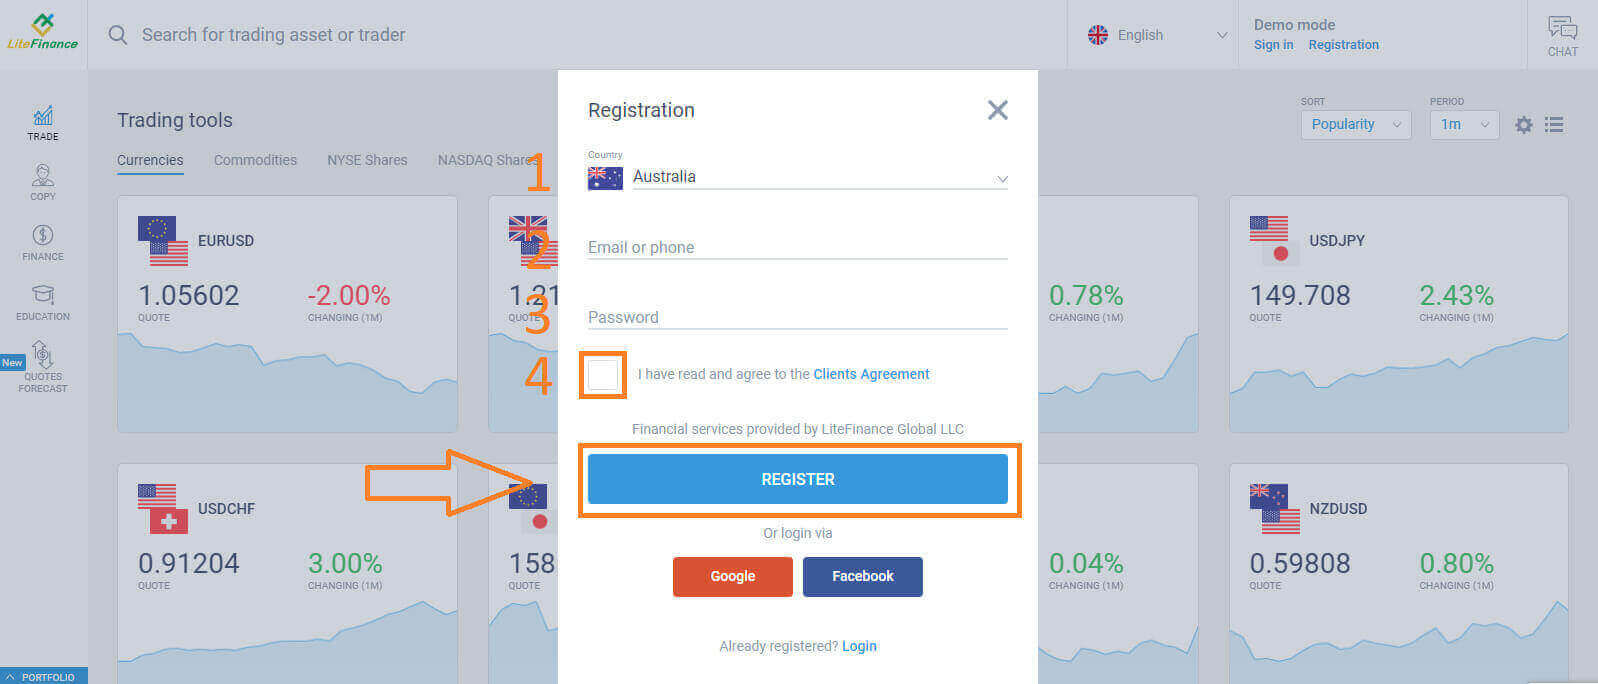
At the registration page, please complete the following actions:
- Choose your residence nation.
- Enter your email address or phone number.
- Create a strong and secure password.
- Please select the checkbox indicating that you have read and agreed to LiteFinance’s Clients Agreement.
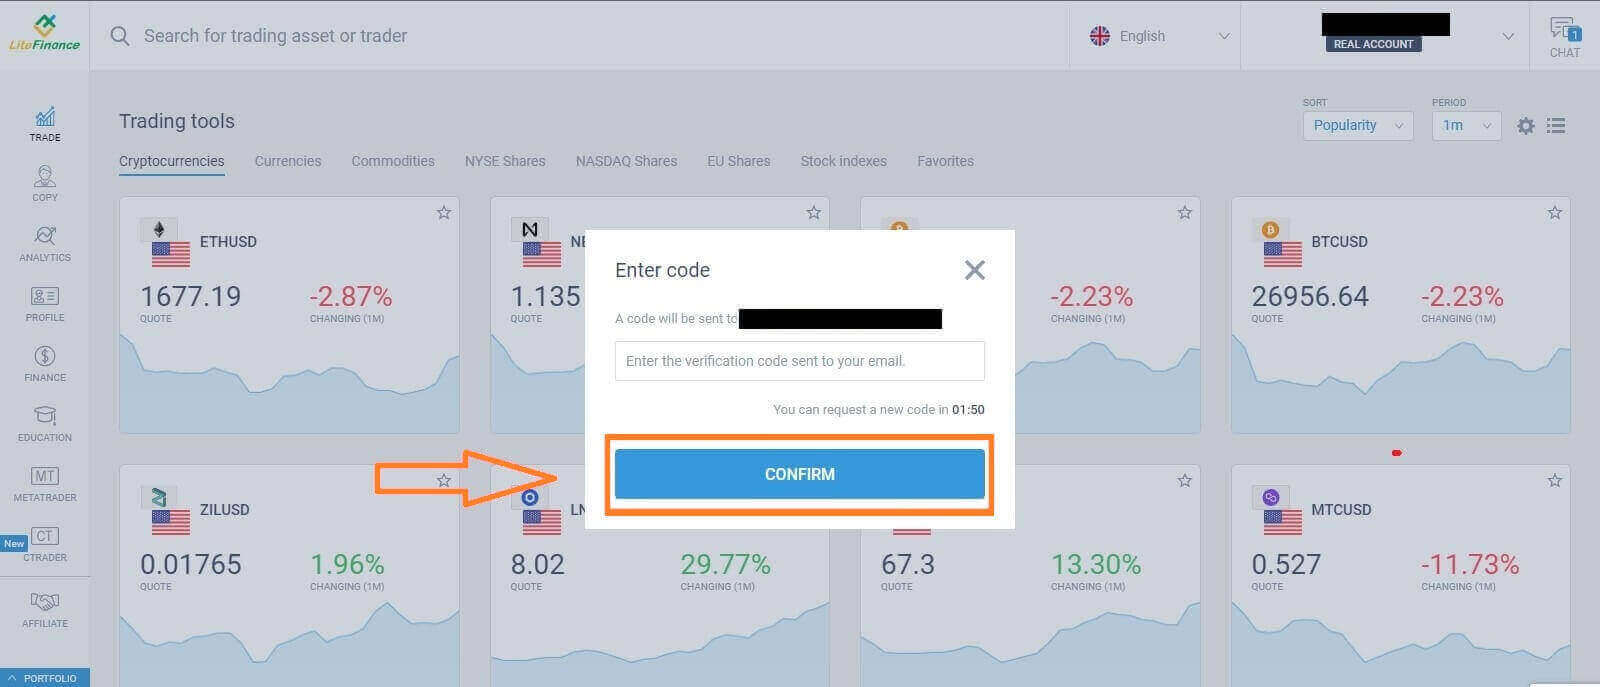
Within a minute, you will receive a verification code, please check your email/ phone number. Then fill in the "Enter code" form and click the "CONFIRM" button.
You can request a new code every 2 minutes if you haven’t received it.
Congratulations! You have successfully registered for a new LiteFinance Account. You will now be directed to the LiteFinance Terminal.
LiteFinance profile verification
When you create a LiteFinance account, the user interface appears next to the chat box in the upper right corner. Move your mouse to "My profile" and click on it.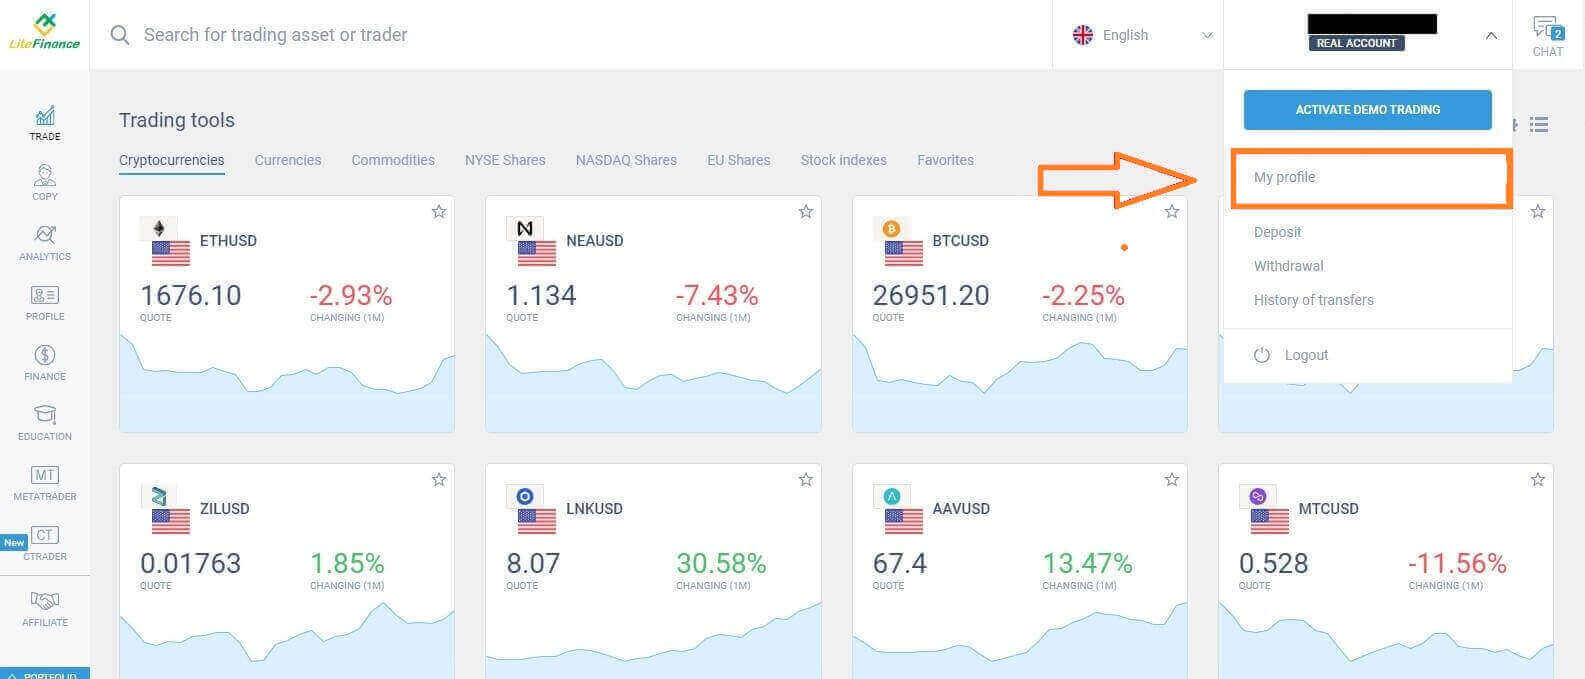 On the next page, click "Verification".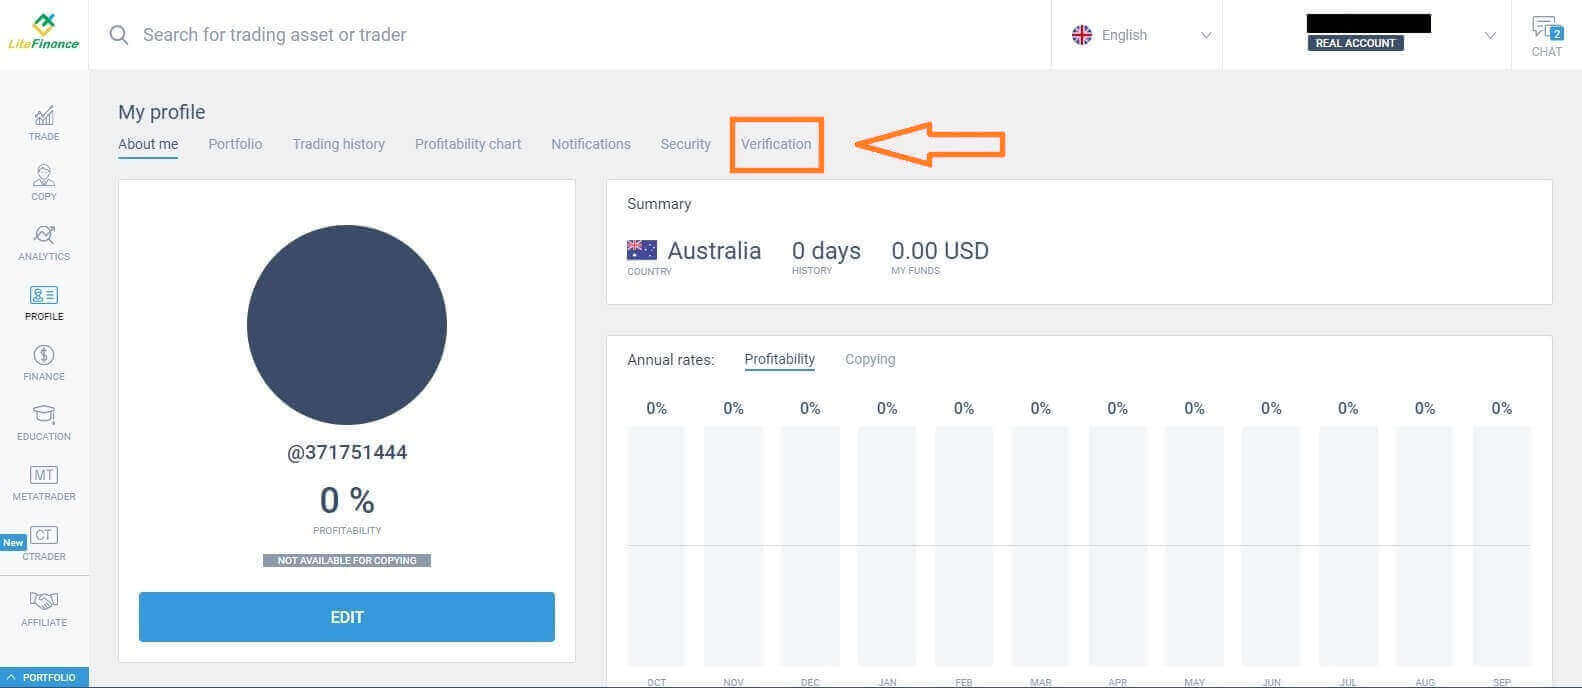
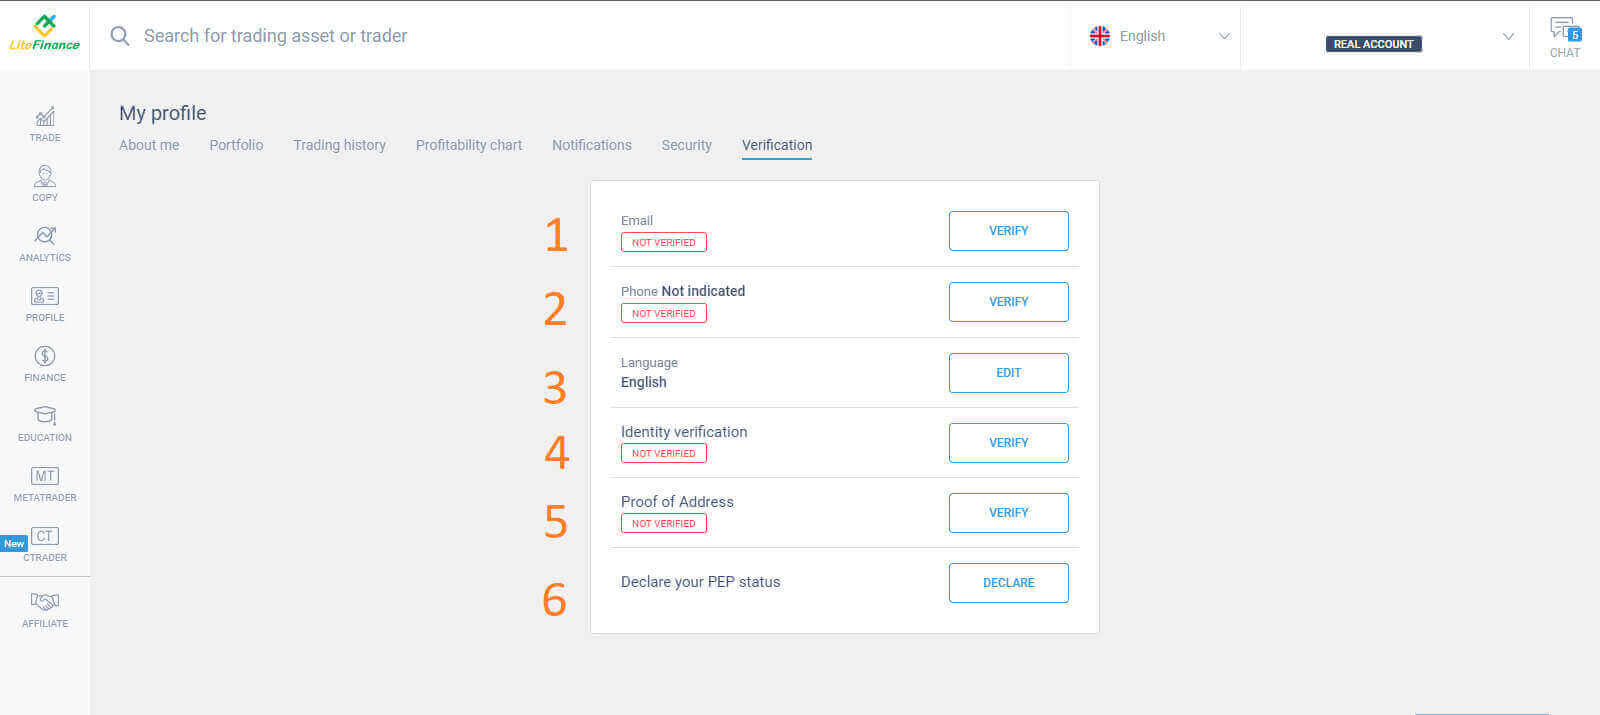
There will be a form on the screen for you to fill out to verify your information, such as:
- Email.
- Phone number.
- Language.
- Name, gender, and date of birth verification.
- Proof of Address (Country, region, city, address, and postcode).
- Your PEP status ( you just need to tick the box declaring you a PEP - Politically Exposed Person).
How to create a trading account
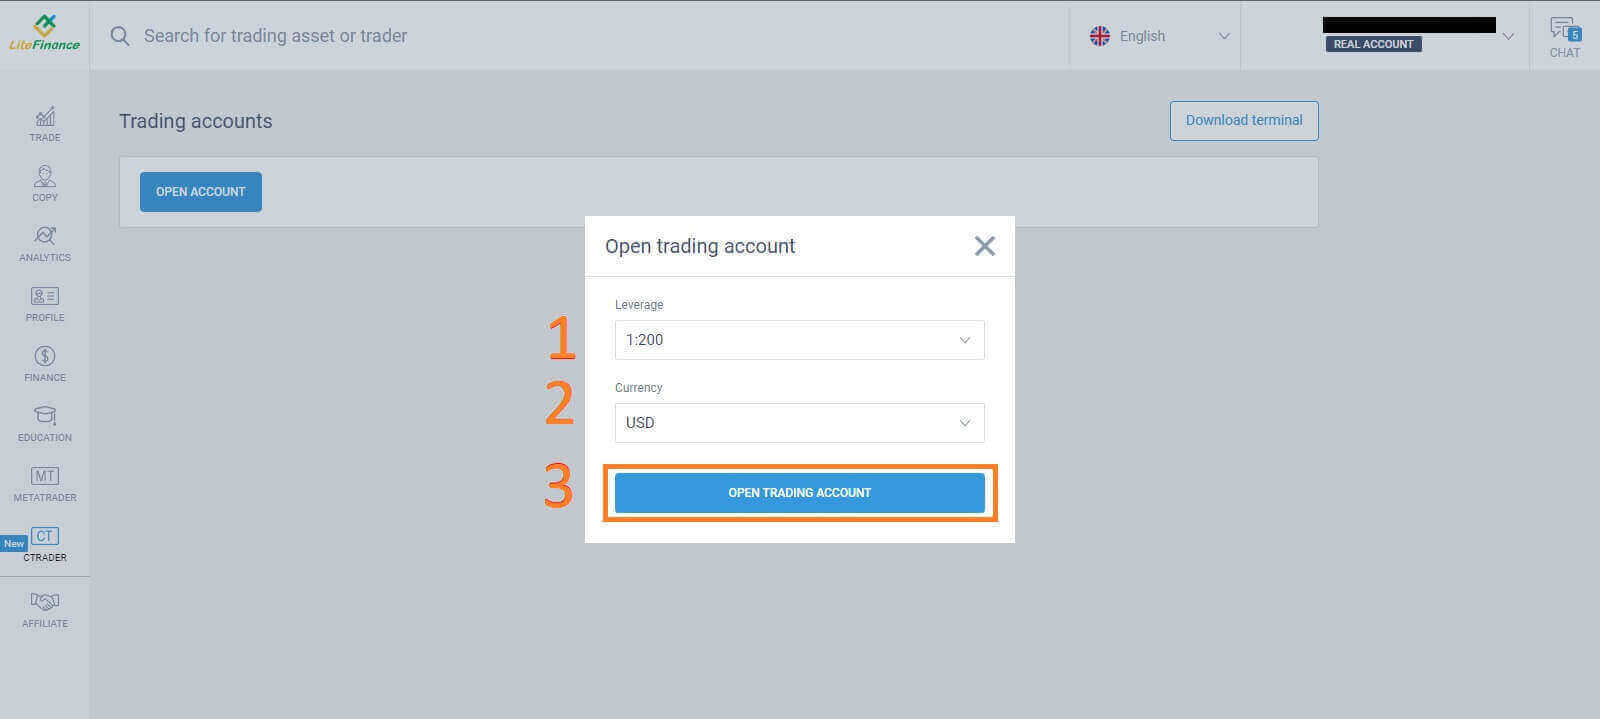
Please choose the "CTRADER" icon on the left side of the screen.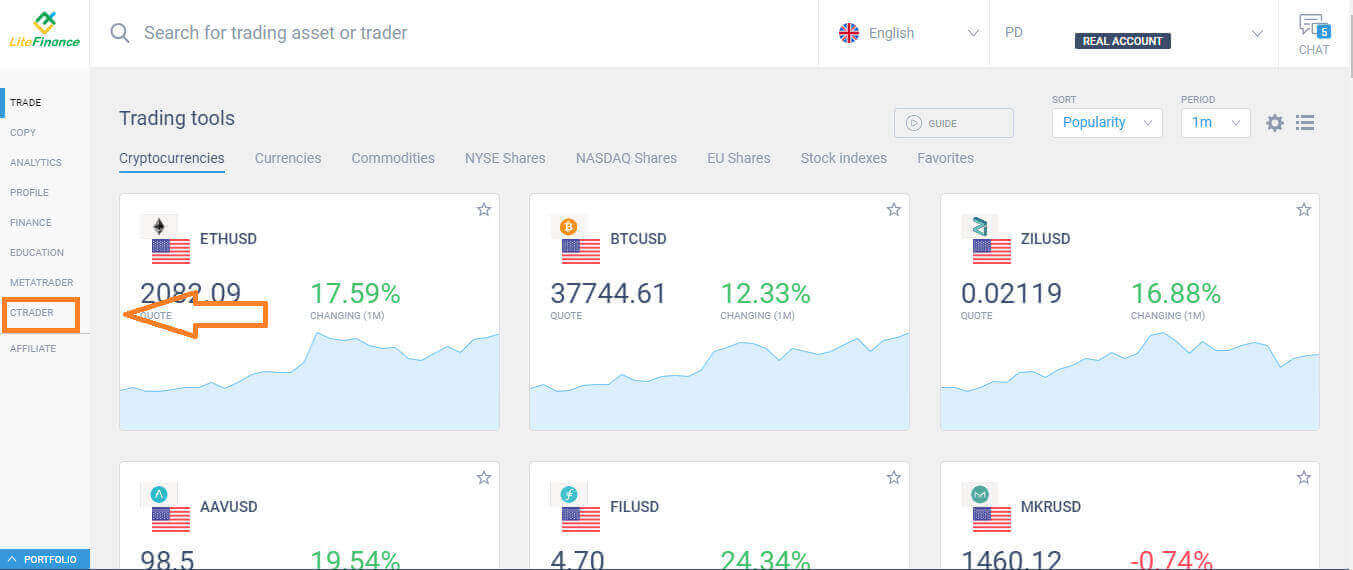 To proceed, please choose "OPEN ACCOUNT".
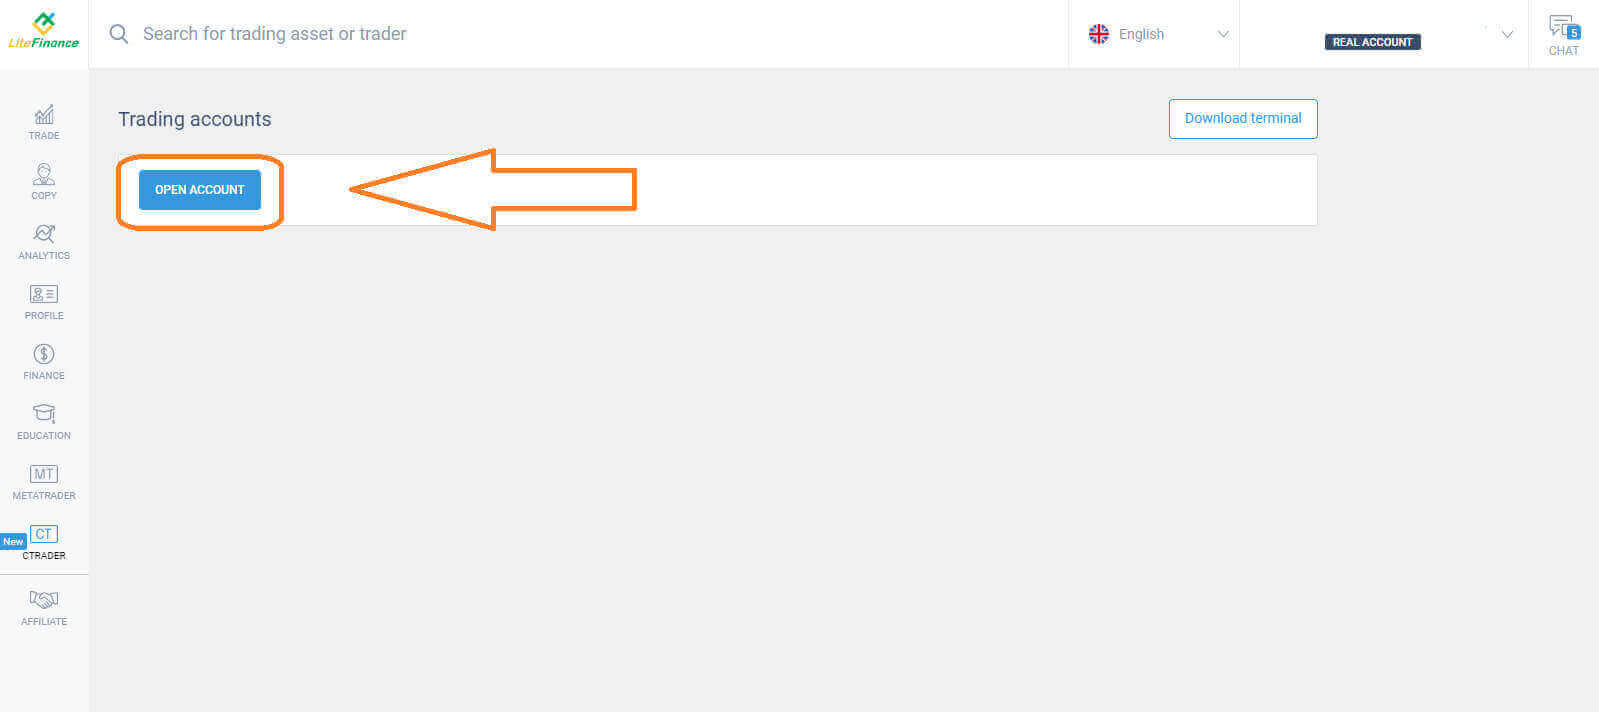 On the "Open Trading Account" form, select your leverage and currency, then choose "OPEN TRADING ACCOUNT".
 Congratulations! Your trading account has been created successfully.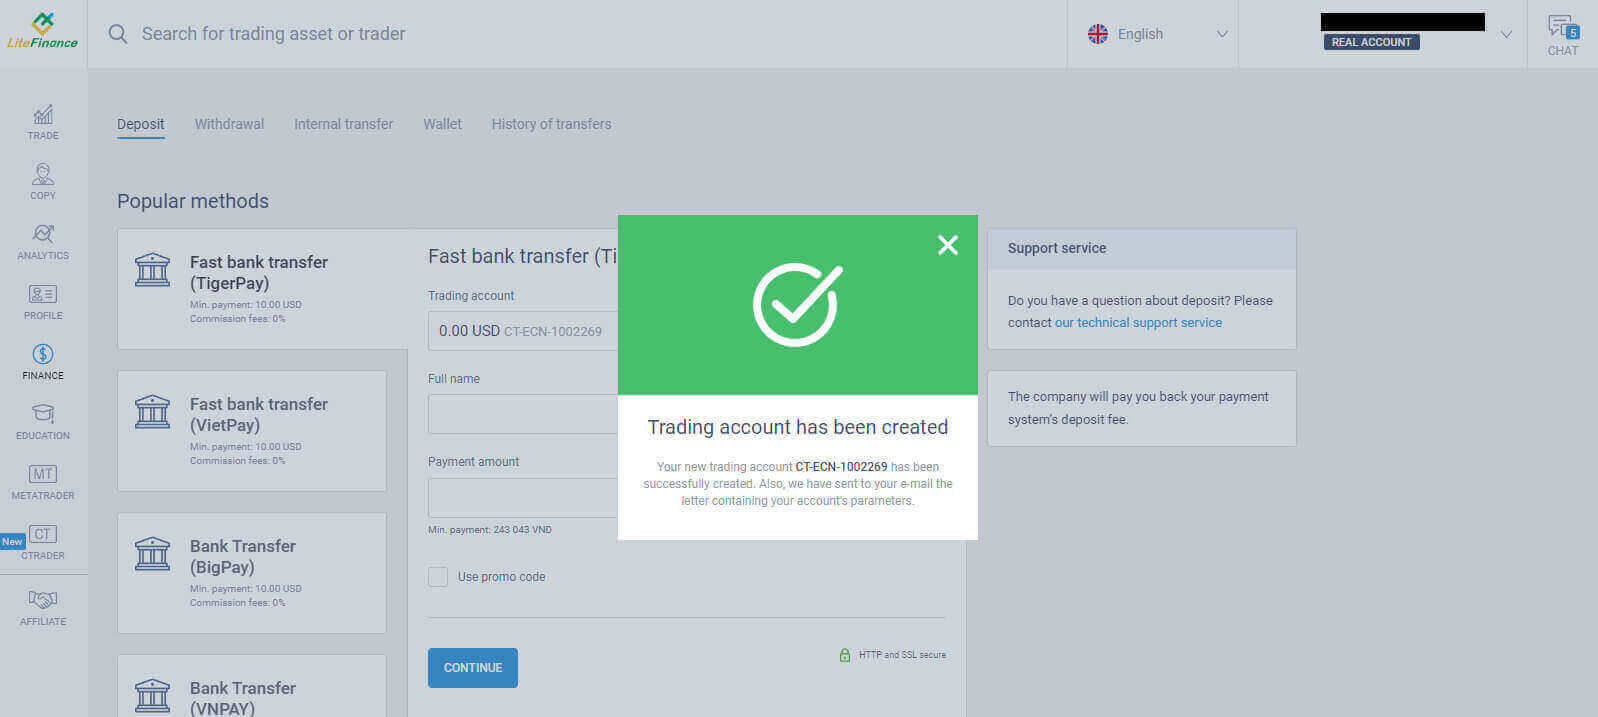
How to Register LiteFinance Account on the Mobile app
Set up and Register an account
Install the LiteFinance Mobile Trading App from the App Store as well as Google Play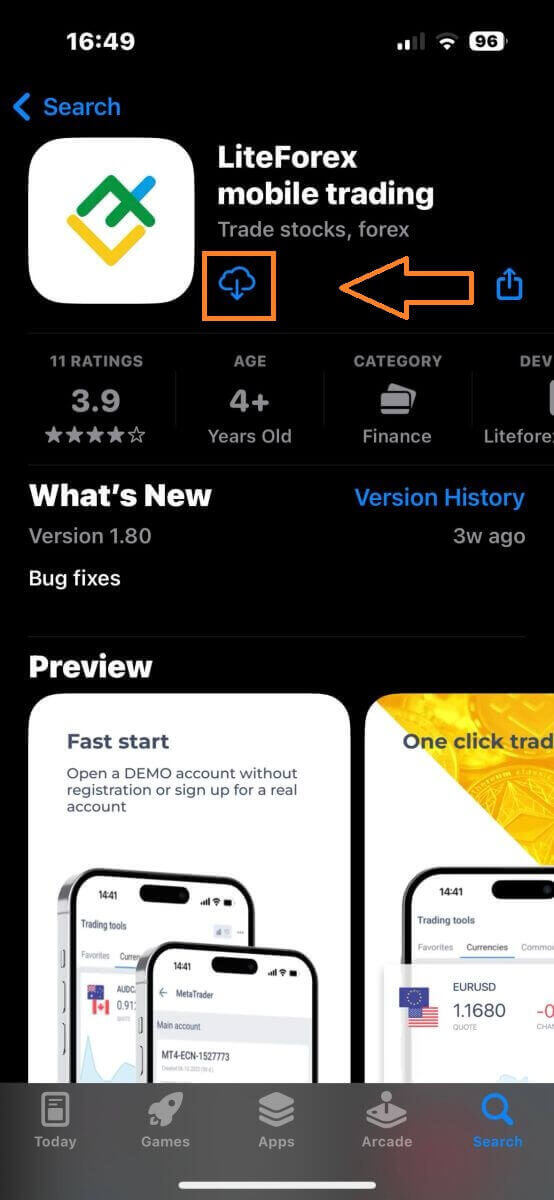
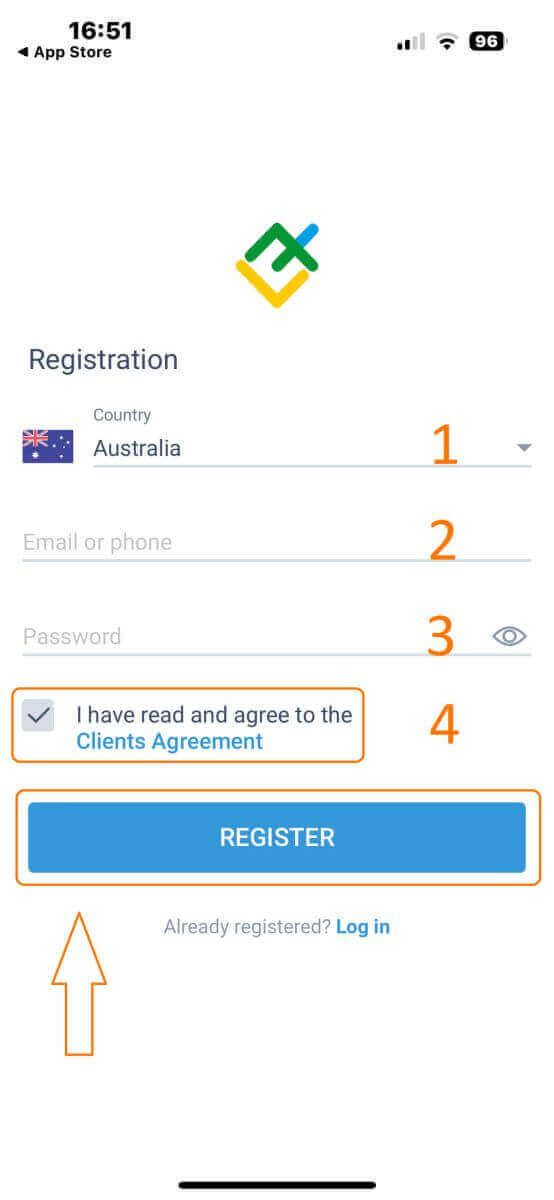
Run the LiteFinance Trading App on your mobile device, then select "Registration".
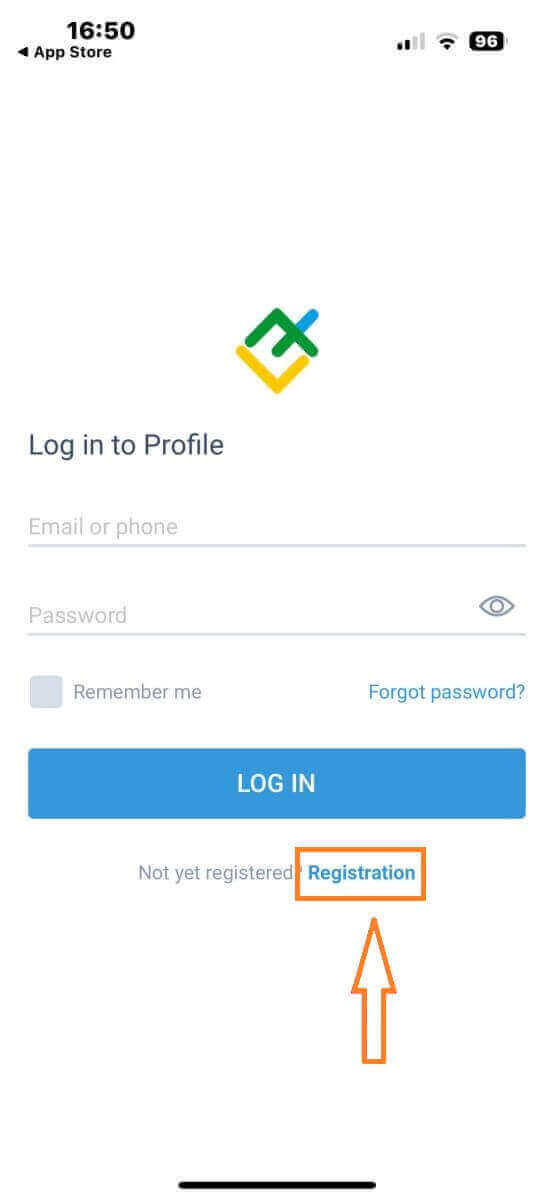
To proceed, you’ll need to complete the registration form by providing specific information:
- Select your country of residence.
- Provide your email address or phone number.
- Establish a secure password.
- Tick the box declaring you have read and agree to the LiteFinance’s Clients Agreement.
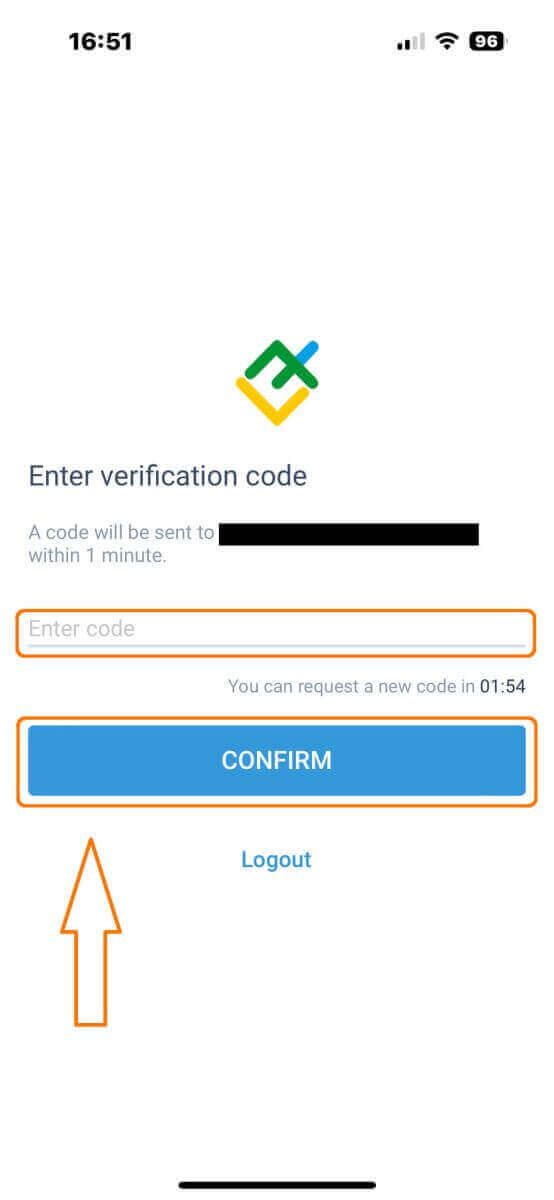
After one minute, you will receive a 6-digit verification code via phone or email. Check your inbox and input the code.
In addition, if you have not received the code within two minutes, touch "RESEND". Otherwise, choose "CONFIRM".
You can construct your own PIN number, which is a 6-digit code. This step is optional; however, you must complete it before accessing the trading interface.
Congratulations! You have successfully set up and are now ready to use the LiteFinance Mobile Trading App.
LiteFinance profile verification
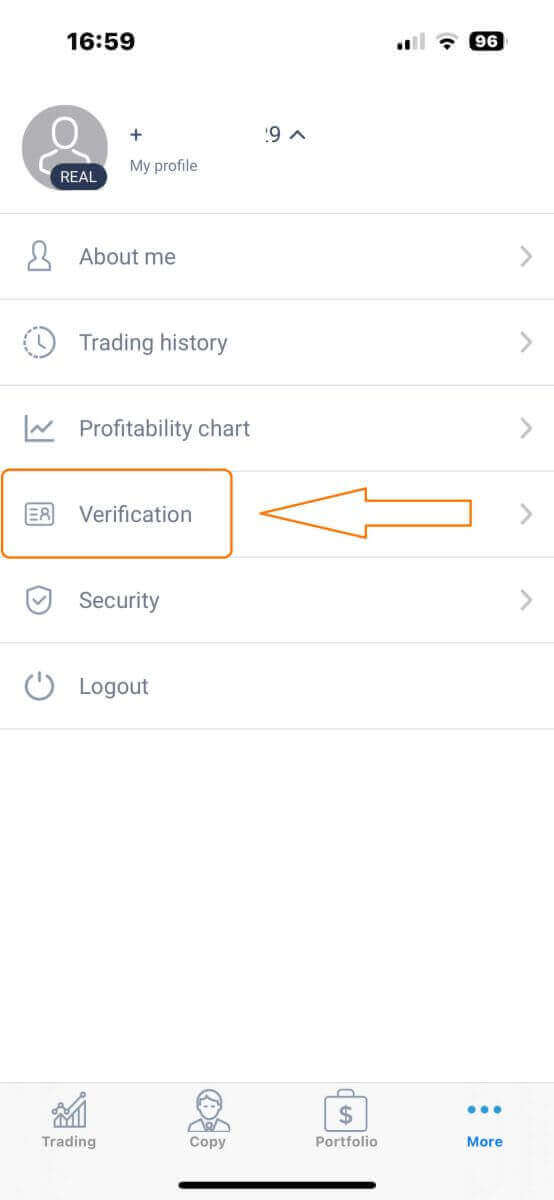
Tap "More" in the bottom right corner of the homepage.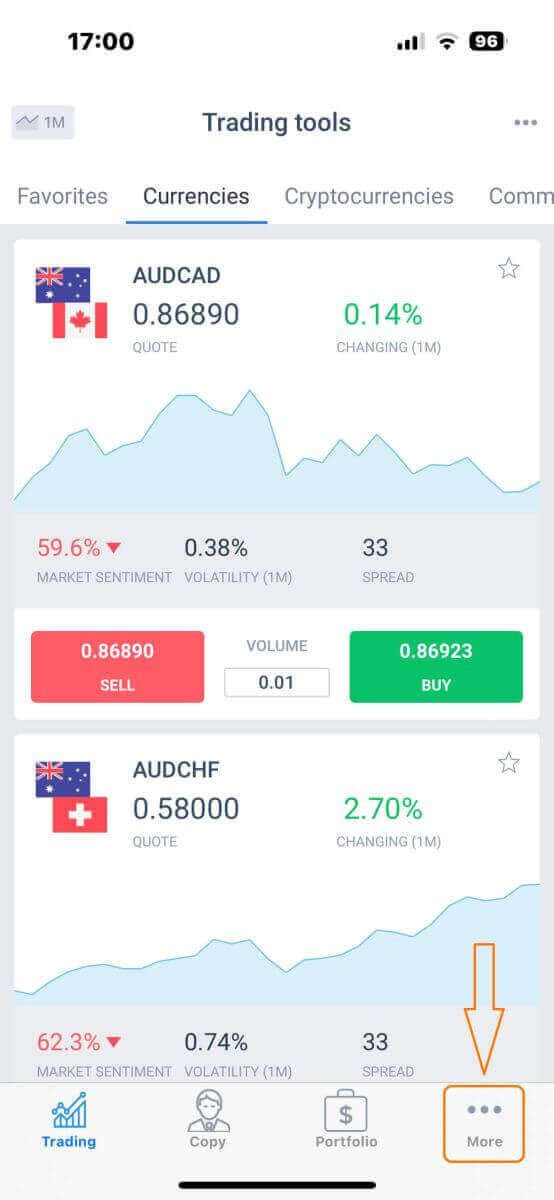
On the first tab, look next to your phone number/ email address and click the dropdown arrow.
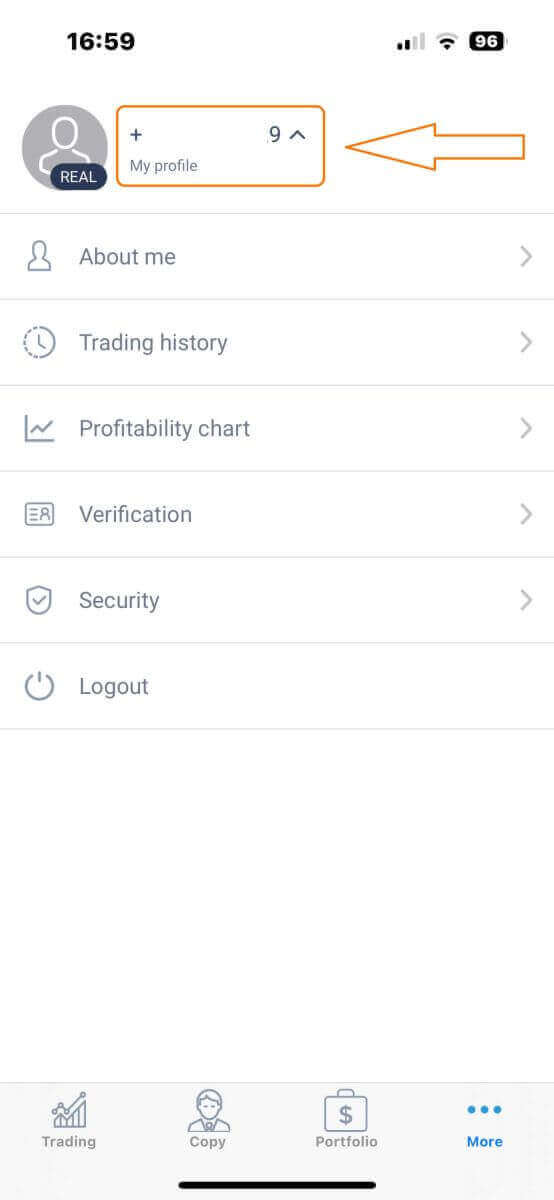
Choose "Verification".
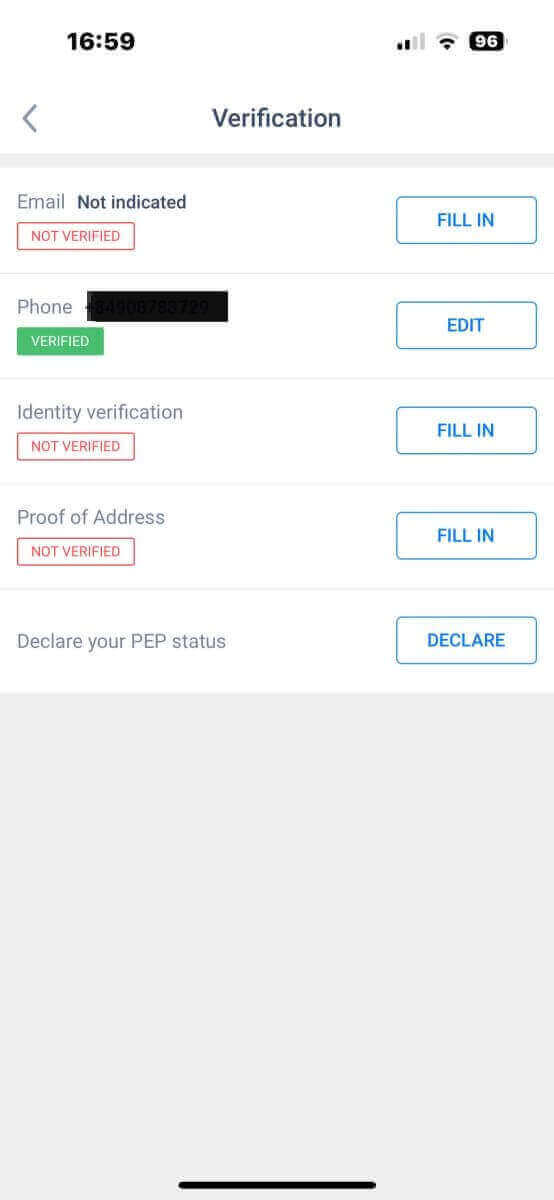
Please ensure that you fill out and authenticate all required details on the verification page:
- Email address.
- Phone number.
- Identity verification.
- Proof of Address.
- Declare your PEP status.
How to create a new trading account
To access MetaTrader, return to the "More" screen and select its corresponding icon.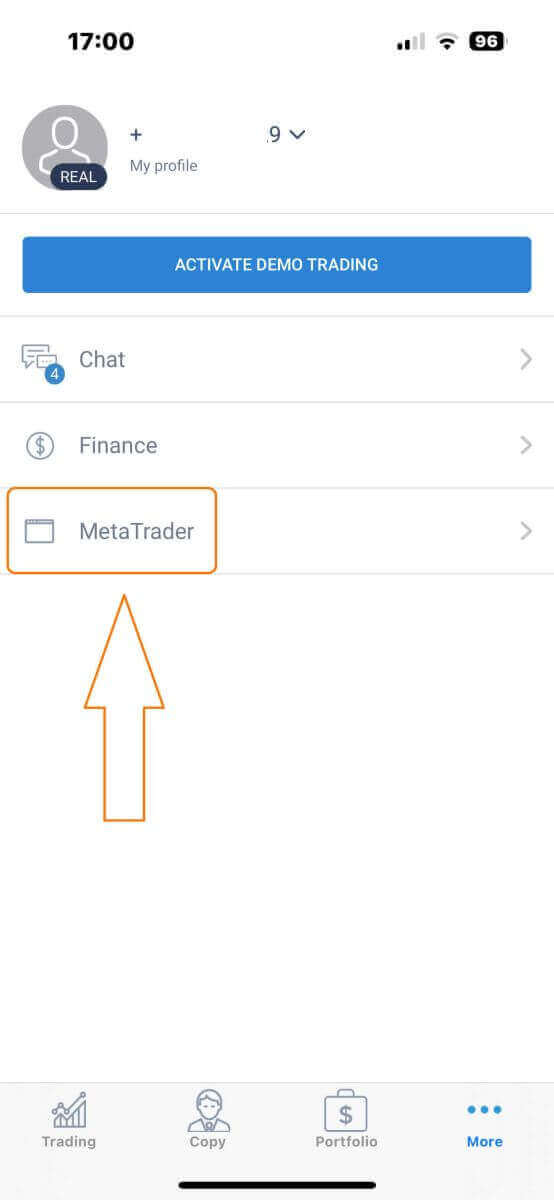
Please scroll down until you locate the "OPEN ACCOUNT" button, and then tap on it.
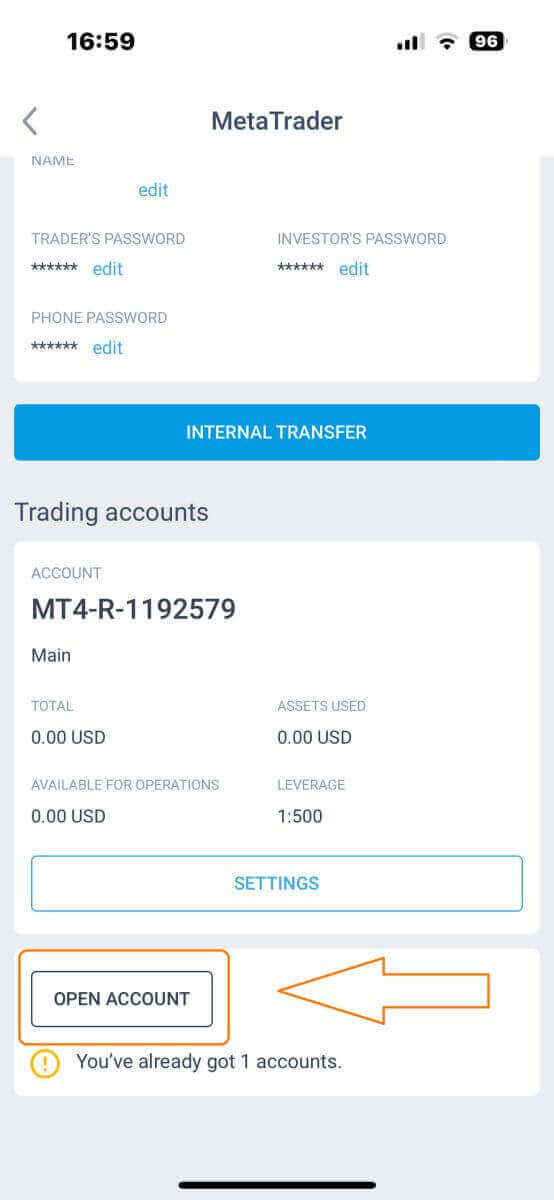
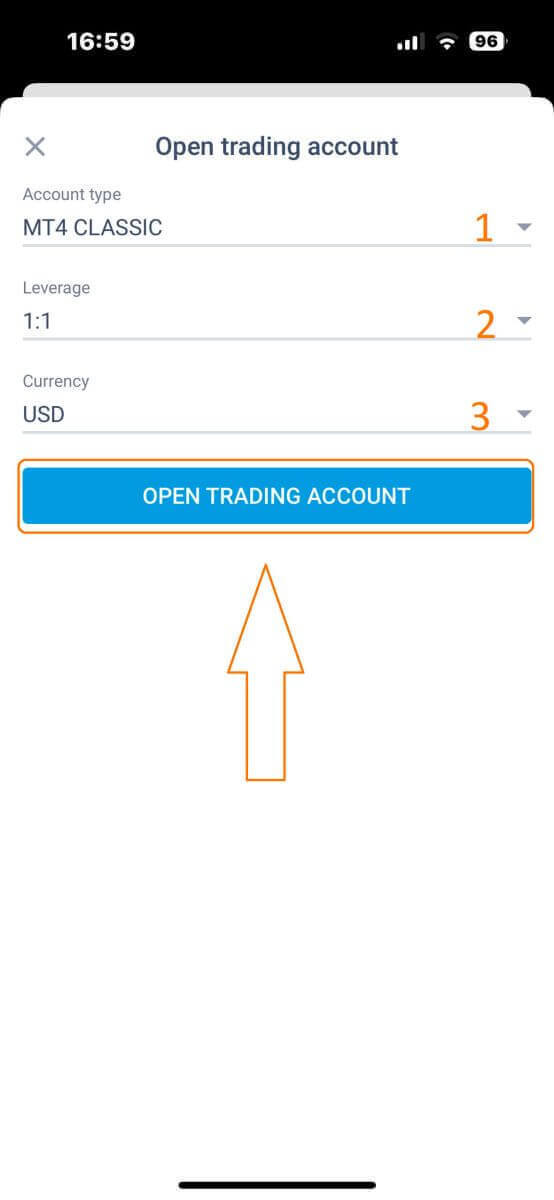
Please enter your account type, leverage, and currency in the "Open Trading Account" box and click "OPEN TRADING ACCOUNT" to complete.
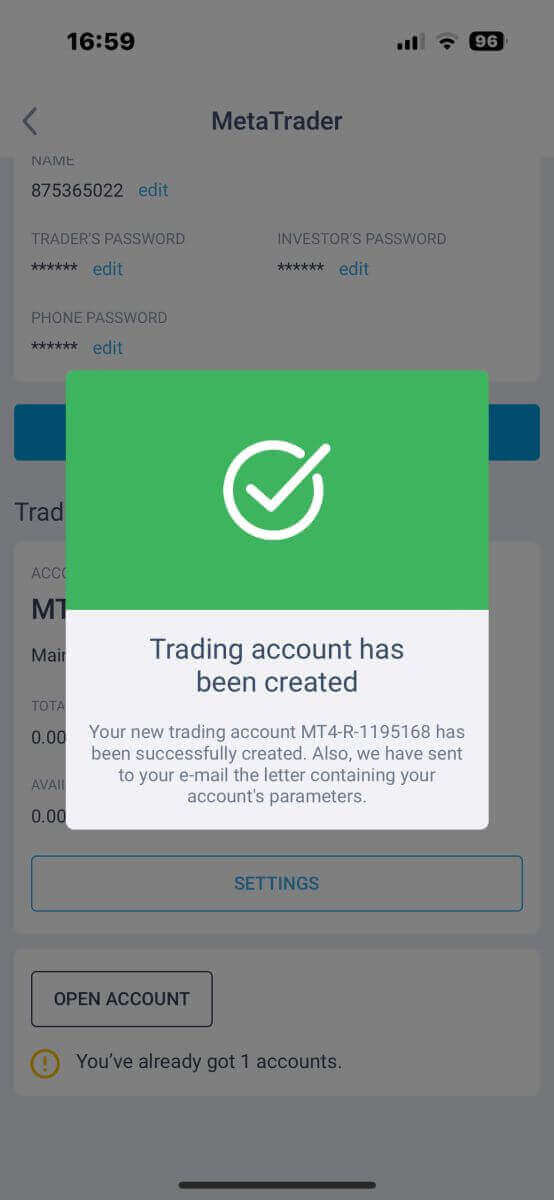
You have successfully created a trading account! Your new trading account will show up below and remember to set one of them to be your main account.
How to Trade on LiteFinance
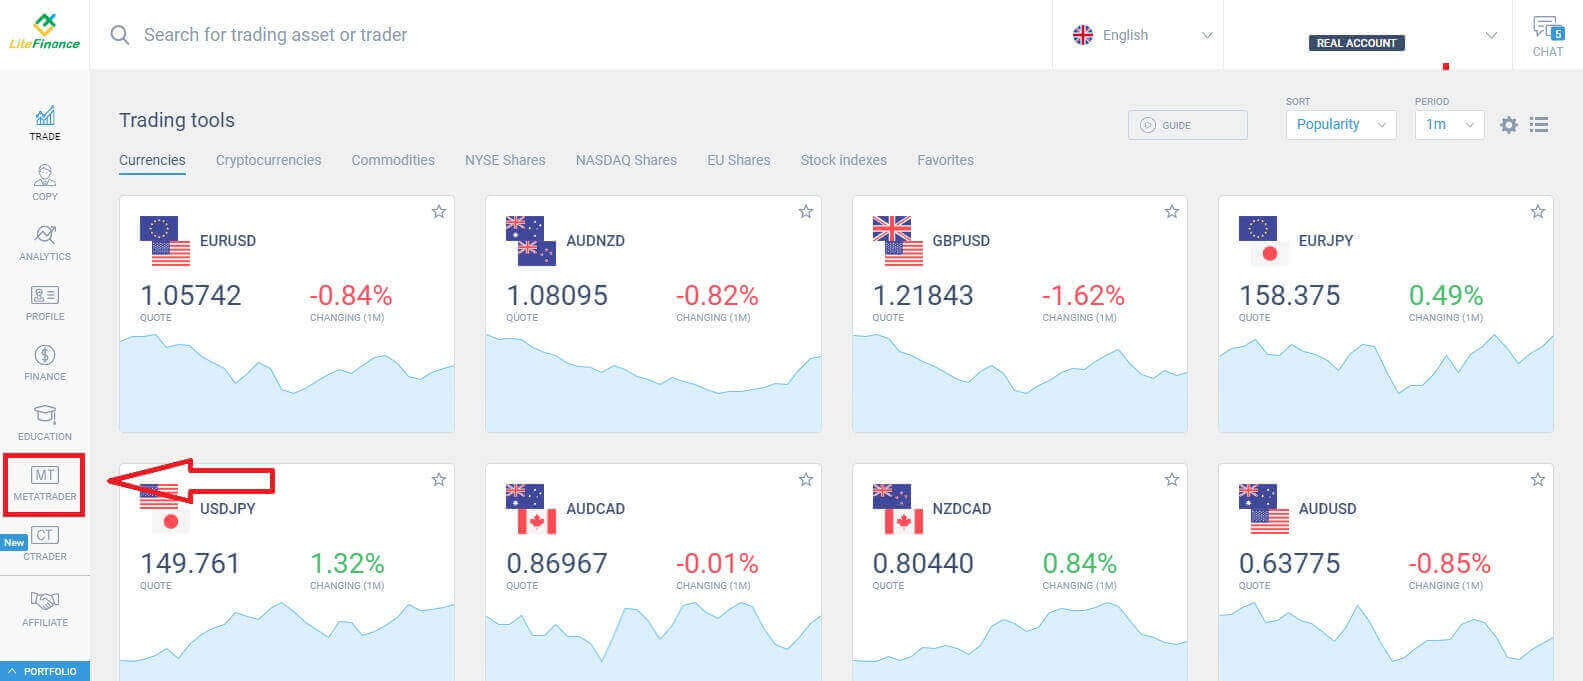
The initial step is to access the LiteFinance homepage using a registered account. Then choose the tab "METATRADER" (If you haven’t registered an account or are unsure about the login process, you can refer to the following post for guidance: How to Login to LiteFinance).
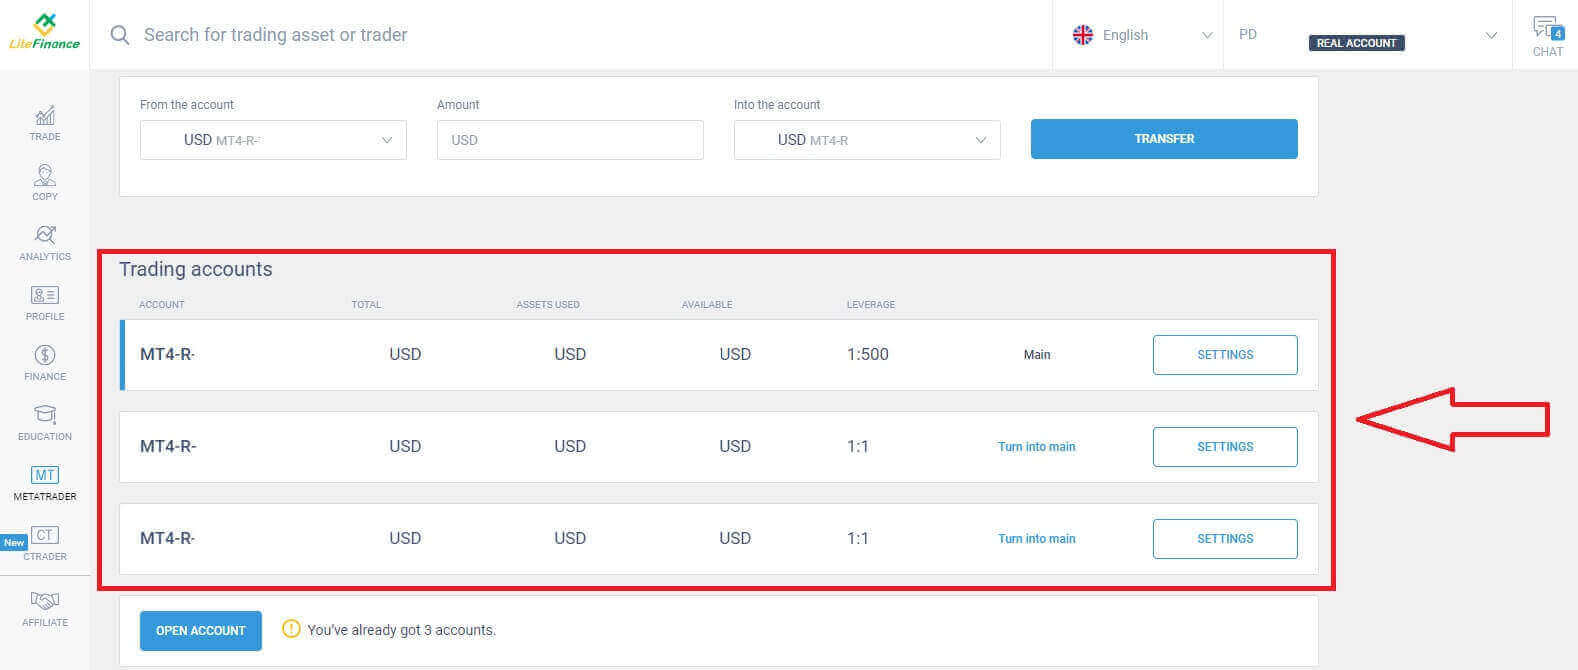
Next, select the trading account that you wish to use to be the main account. If the selected account is not the main account, click the text "Turn into main" in the same row as the selected account.
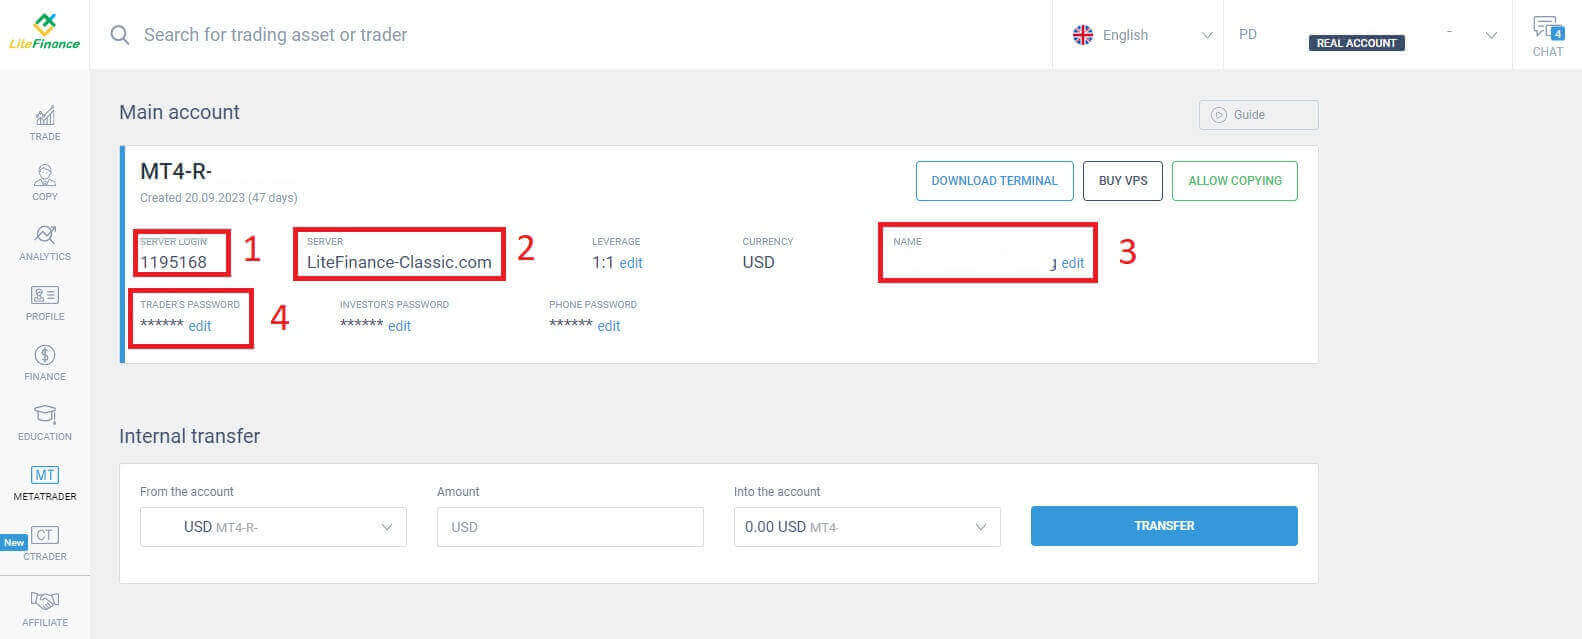
 Scroll up with your mouse, and here, you will find some important information you need for logging in:
- The server login number.
- The server to log in.
- The name is shown in the terminal.
- The trader’s password to log in.
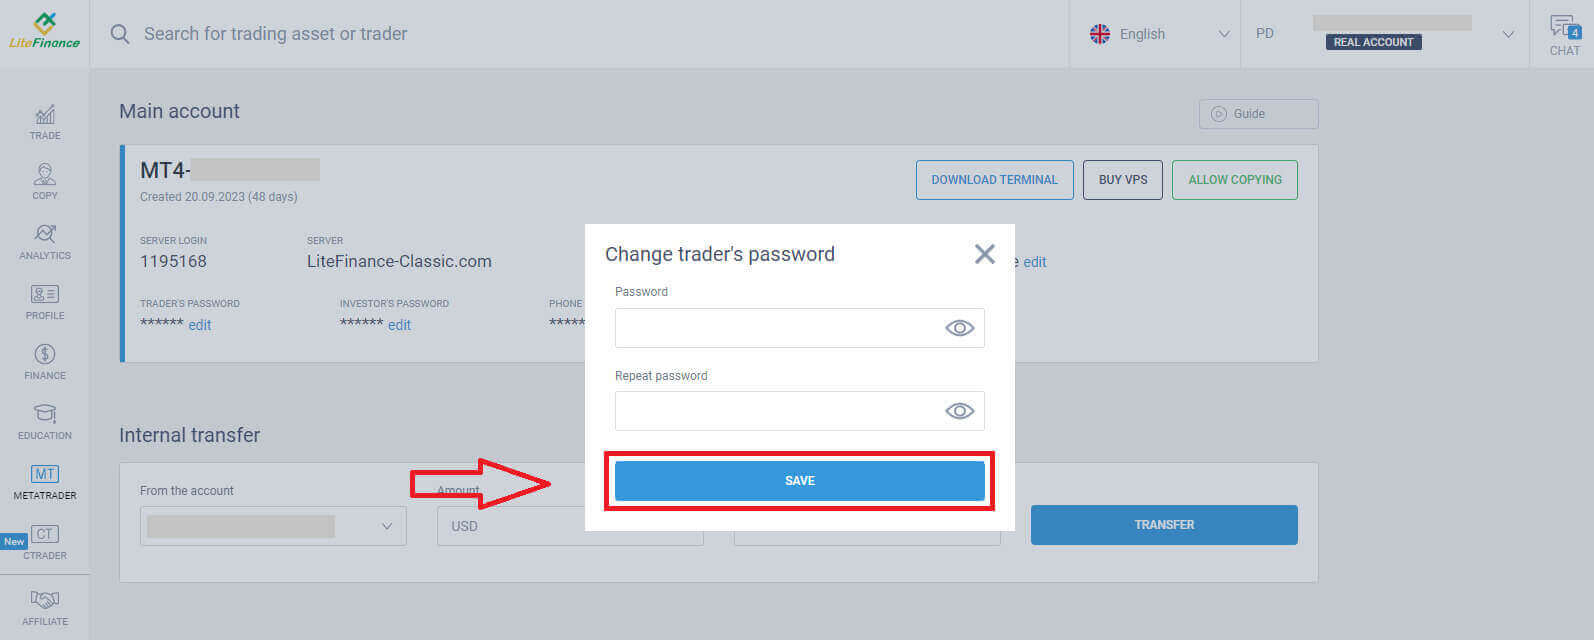
For the password section, click on the "edit" button next to the password field to change your password to meet the system’s requirements. After you’ve completed that, click "Save".
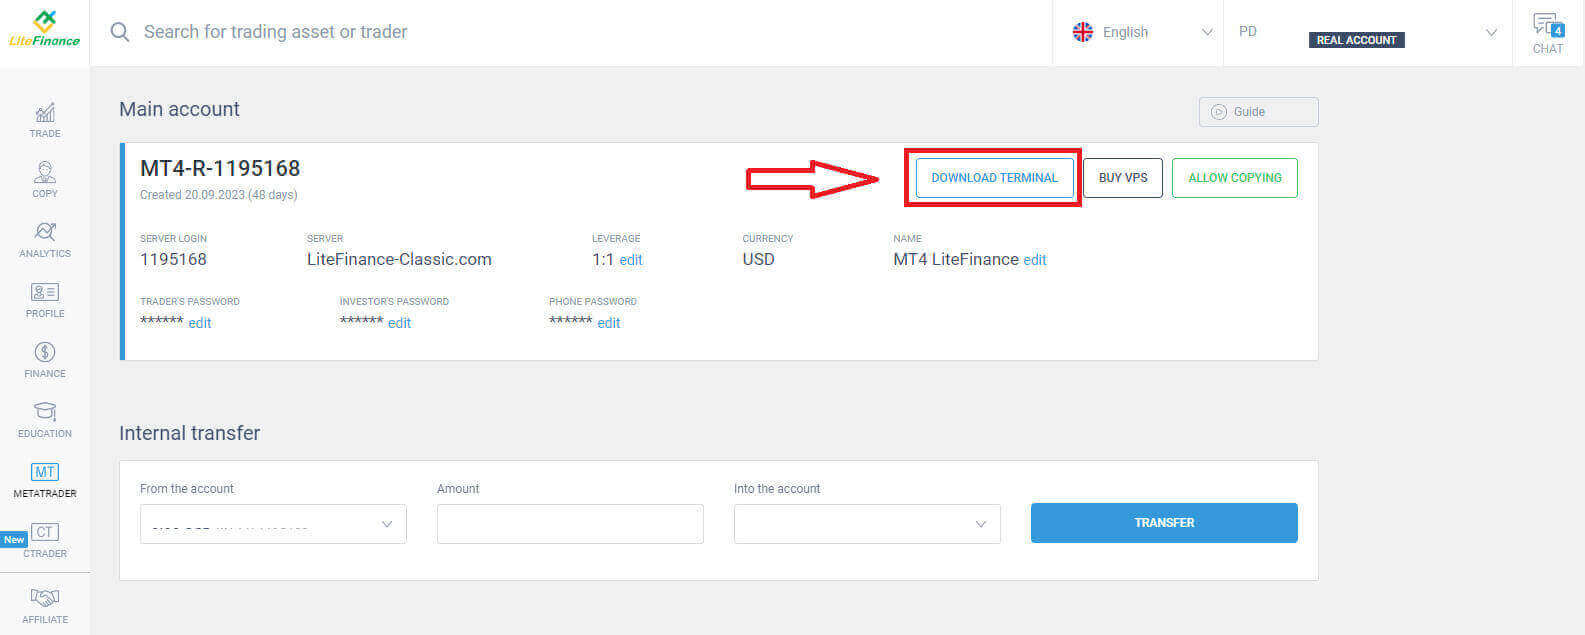
In the next step, you will proceed with the download and launch the LiteFinance MT4 Terminal by clicking on the "DOWNLOAD TERMINAL" button.
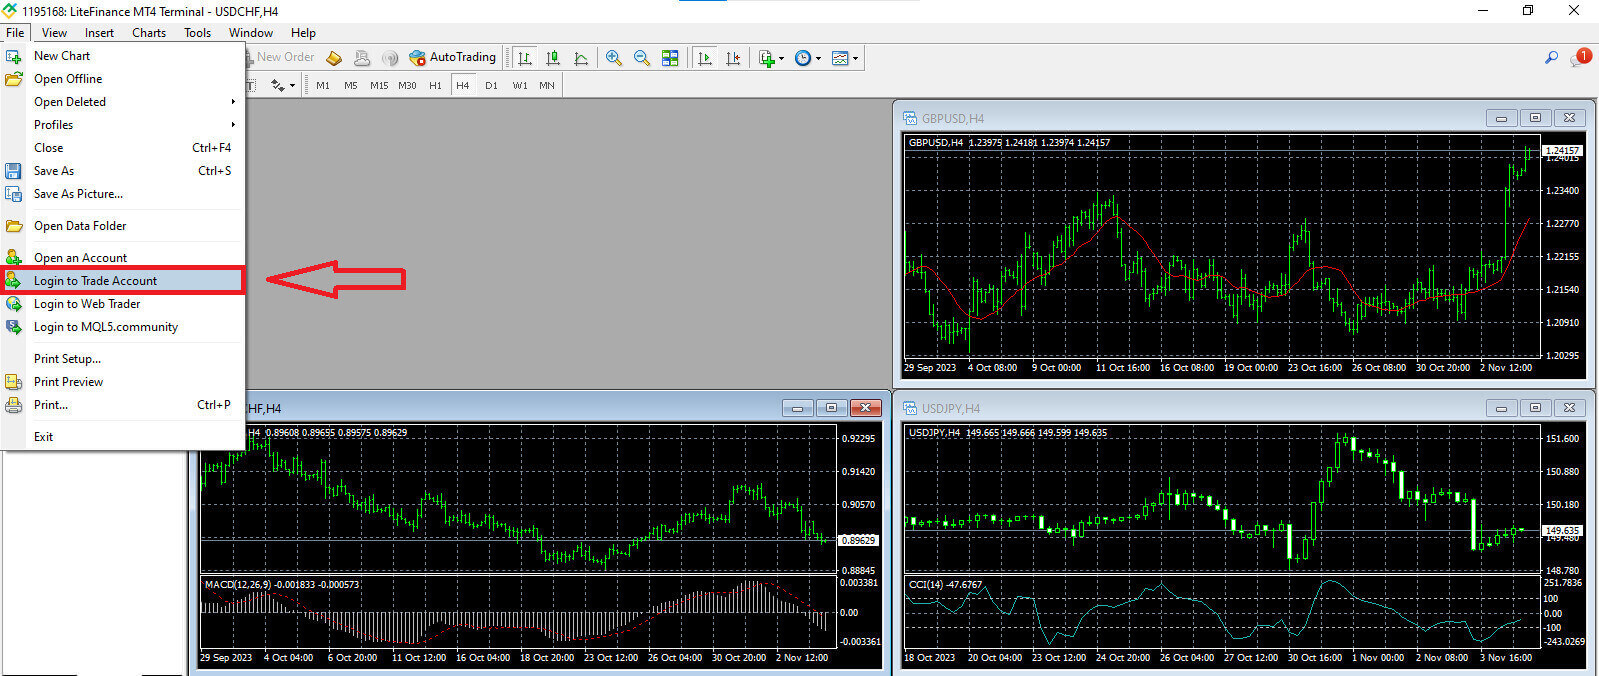
After running the terminal, please select the "File" menu at the top left corner of the screen. 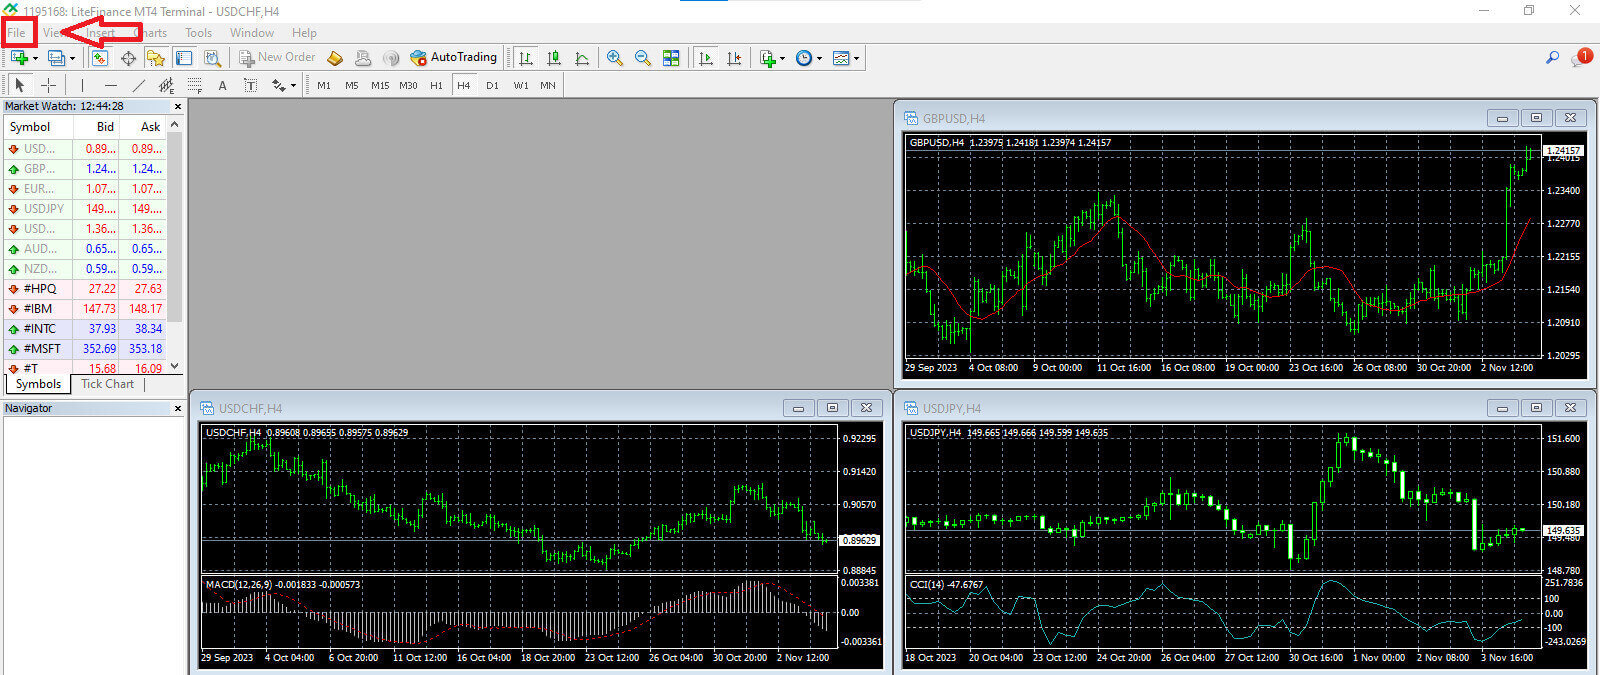
Continue by selecting "Login to Trade Account" to open the login form.
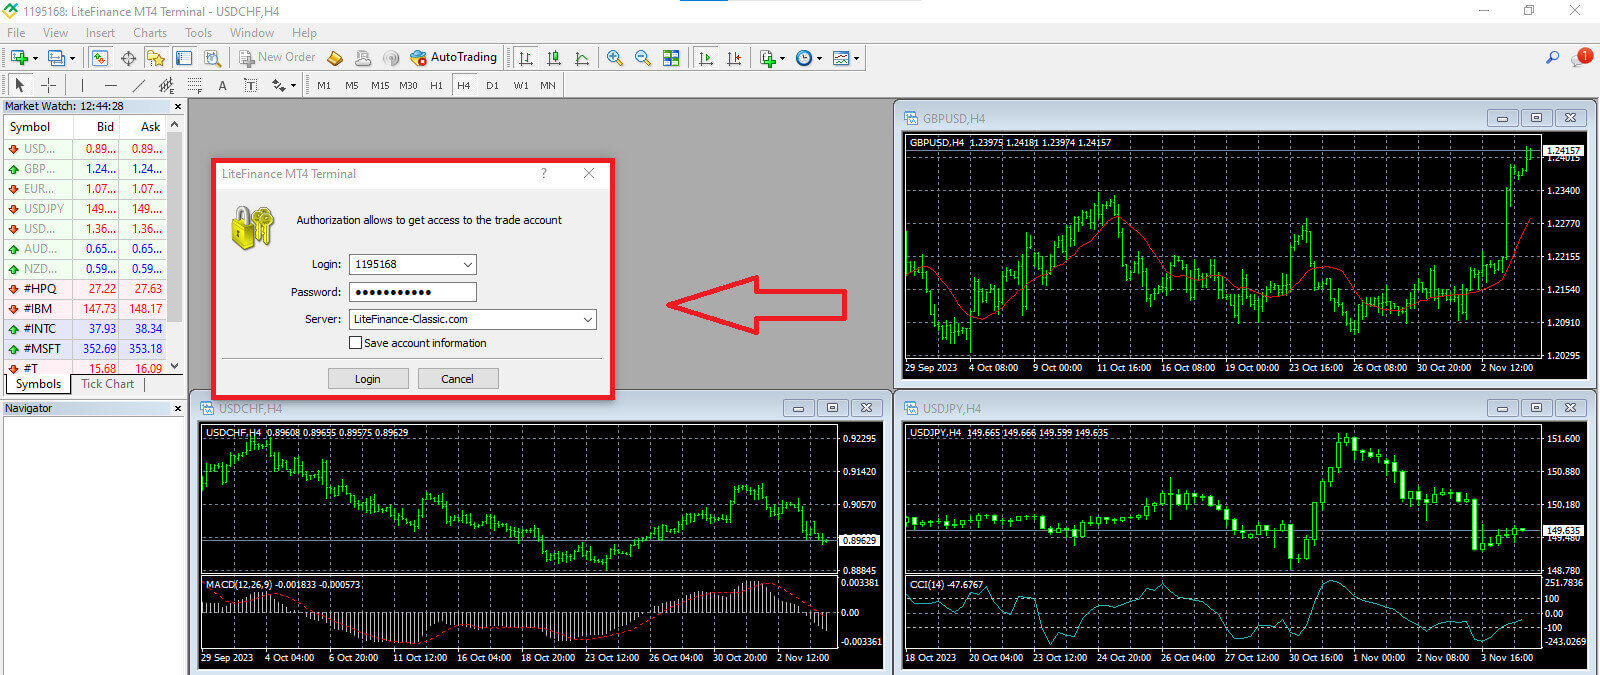
In this form, you will need to provide some information from the selected trading account in the previous step to log in:
- In the first blank from the top, enter your "SERVER LOGIN" number.
- Enter the password that you created from the previous step.
- Select the trading server that the system shows in the trading account settings.
How to place a New Order on LiteFinance MT4
First, you need to select the asset and access its chart.
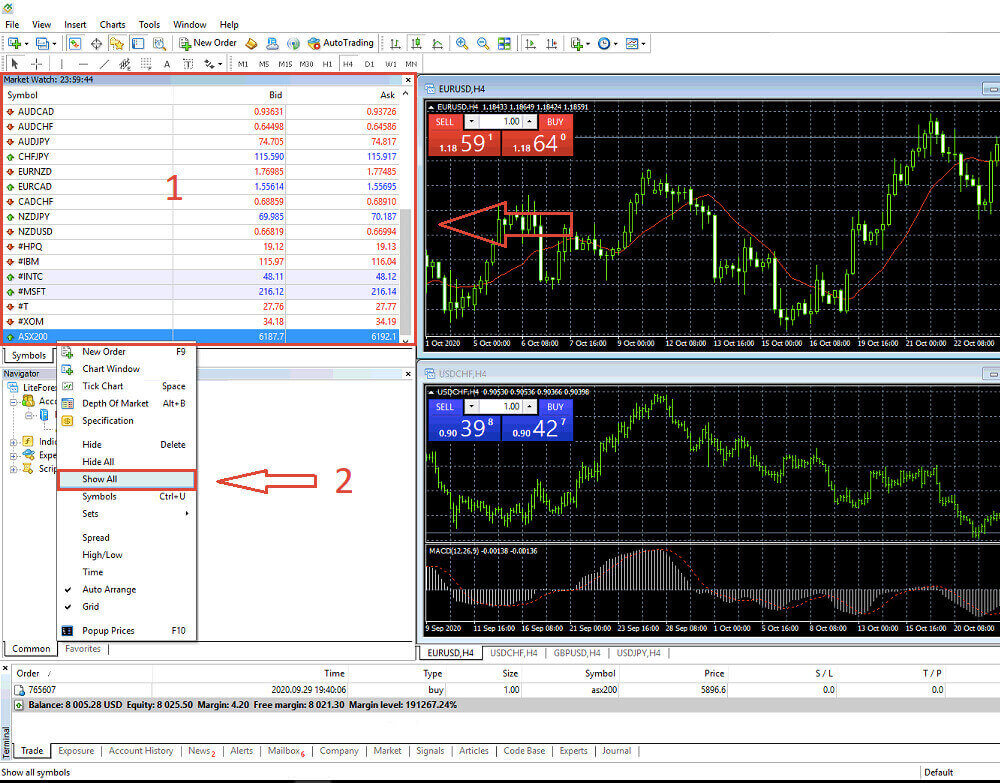
To view the Market Watch, you can either go to the "View" menu and click on Market Watch or use the shortcut Ctrl+M. In this section, a list of symbols is displayed. To display the complete list, you can right-click within the window and choose "Show all". If you prefer to add a specific set of instruments to the Market Watch, you can do so by using the "Symbols" drop-down menu.
To load a specific asset, like a currency pair, onto a price chart, click once on the pair. After selecting it, click and hold your mouse button, drag it to the desired location, and release the button.
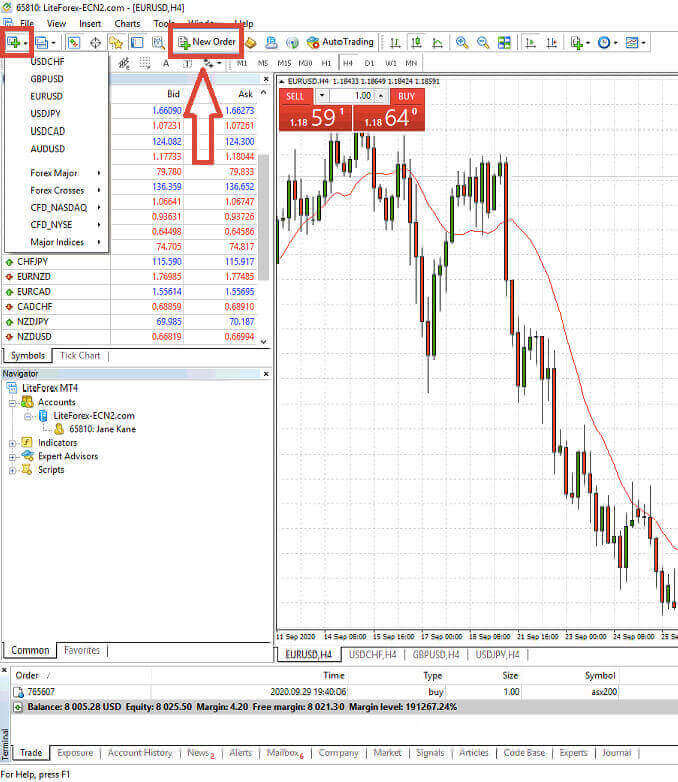
For opening a trade, first, select the "New Order" menu option or click on the corresponding symbol in the standard toolbar.
A window will appear immediately, containing settings to help you place orders more precisely and easily:
- Symbol: Ensure that the currency symbol you want to trade is visible in the symbol box.
- Volume: You need to determine the contract size by either selecting it from the available options in the dropdown menu after clicking the arrow or by manually inputting the desired value in the volume box. Remember that the size of your contract directly impacts the potential profit or loss.
- Comment: This section is optional, but you can utilize it to annotate your trades for identification purposes.
- Type: This is configured as market execution by default including Market Execution (involves executing orders at the current market price) and Pending Order (employed to establish a future price at which you plan to initiate your trade).
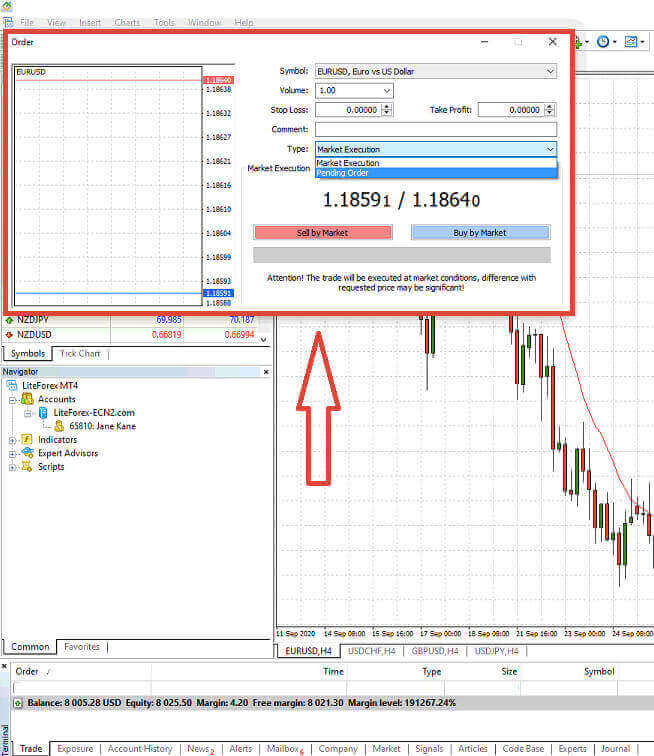
Lastly, you must determine the type of order you want to initiate, offering the choice between a sell or buy order.
- Sell by Market: These orders commence at the bid price and conclude at the ask price. With this order type, your trade has the potential to generate a profit when the price declines.
- Buy by Market: These orders begin at the ask price and finish at the bid price. With this order type, your trade can be profitable if the price rises.

How to place a Pending Order on LiteFinance MT4
How many pending orders
In contrast to immediate execution orders, which are executed at the current market price, pending orders enable you to place orders that activate once the price reaches a specific level defined by you. There are four types of pending orders, but we can categorize them into two main types:- Orders expecting to break a certain market level.
- Orders are expected to bounce back from a certain market level.

Buy Stop
The Buy Stop order enables you to place a purchase order at a price higher than the current market rate. For instance, if the present market price is $500, and your Buy Stop is set at $570, a buying or long position will be initiated when the market reaches this price point.
Sell Stop
The Sell Stop order provides the option to place a selling order at a price lower than the current market rate. For example, if the current market price stands at $800, and your Sell Stop price is fixed at $750, a selling or ’short’ position will be activated when the market attains that particular price point.

Buy Limit
The Buy Limit order is essentially the inverse of a buy stop. It permits you to establish a buy order at a price lower than the prevailing market rate. To illustrate, if the current market price stands at $2000 and your Buy Limit price is set at $1600, a buy position will be initiated when the market attains the $1600 price level.
Sell Limit
Ultimately, the Sell Limit order empowers you to establish a sell order at a price higher than the prevailing market rate. To be more specific, if the current market price is $500, and your Sell Limit price is $850, a sell position will be initiated when the market reaches the $850 price level.

Opening Pending Orders
To create a new pending order, you can easily double-click the market name in the Market Watch module. This action will launch the new order window, allowing you to modify the order type to Pending Order.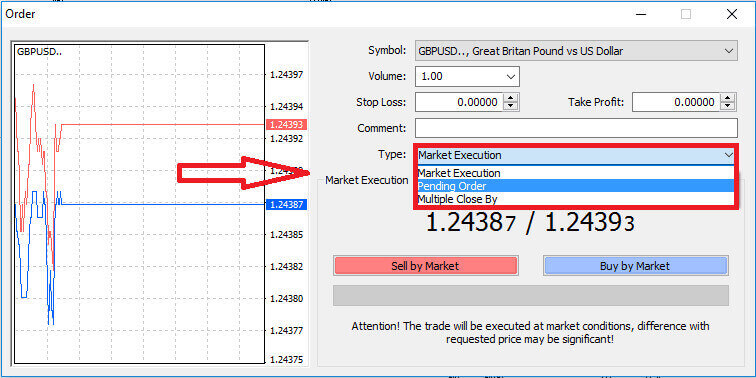
Subsequently, designate the market level at which the pending order will trigger. You should also determine the position size according to the volume.
If needed, you can establish an expiration date (Expiry). After configuring all these parameters, choose your preferred order type based on whether you intend to go long or short, and whether it’s a stop or limit order. Finally, select the "Place" button to confirm.
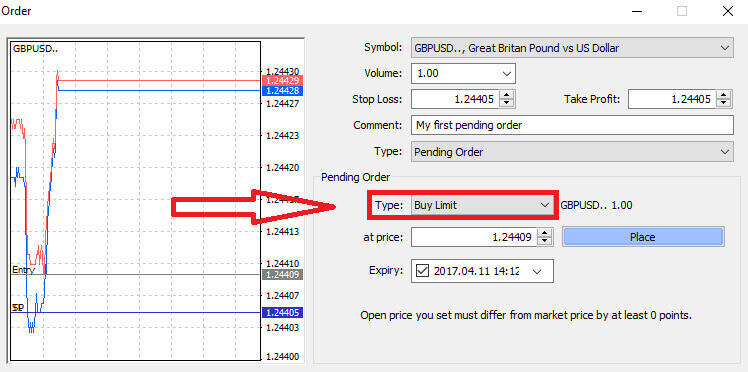
Pending orders offer significant advantages within MT4. They prove especially valuable when you cannot keep a constant eye on the market to pinpoint your entry, or when an instrument’s price experiences rapid fluctuations, ensuring you don’t miss out on promising opportunities.
How to Close Orders on LiteFinance MT4 Terminal
Here, we have two incredibly simple and quick ways to close orders, which are:
- To close an active trade, select the "X" located in the Trade Tab within the Terminal window

- Alternatively, you can right-click on the order line displayed on the chart and choose "close" to close the position.
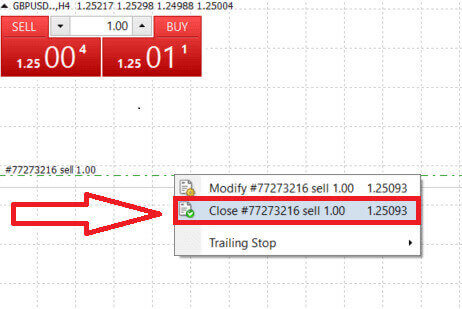
In LiteFinance’s MT4 terminal, opening and closing orders are remarkably swift and user-friendly processes. With just a few clicks, traders can execute orders efficiently and without unnecessary delays. The platform’s intuitive design ensures that market entry and exit are both quick and convenient, making it an ideal choice for traders who need to act promptly and seize opportunities as they arise.
Using Stop Loss, Take Profit, and Trailing Stop on LiteFinance MT4
A crucial aspect of ensuring lasting success in financial markets is the practice of careful risk management. This is why incorporating stop-loss and take-profit orders into your trading strategy is of paramount importance. In the following discussion, we’ll delve into the practical implementation of these risk management tools within the MT4 platform. By mastering the use of stop losses and take profits, you’ll not only learn how to mitigate potential losses but also how to optimize your trading capabilities, ultimately enhancing your overall trading experience.
Setting Stop Loss and Take Profit
One of the most straightforward methods to incorporate Stop Loss and Take Profit in your trades is to set them immediately when you initiate new orders. This approach allows you to establish risk management parameters as you enter the market, enhancing control over your positions and potential outcomes.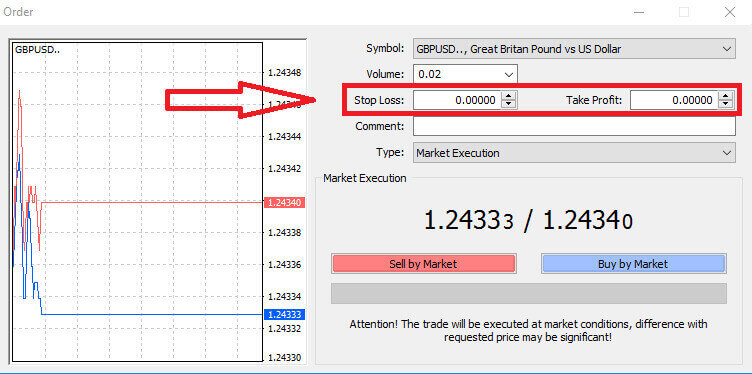
You can achieve this by simply entering your desired price levels in the Stop Loss and Take Profit fields. Keep in mind that a Stop Loss automatically triggers when the market moves unfavorably for your position, serving as a protective measure, while Take Profit levels are executed once the price reaches your predetermined profit target. This flexibility enables you to set your Stop Loss level below the current market price and your Take Profit level above it.
It’s important to note that Stop Loss (SL) and Take Profit (TP) are always linked to an active position or a pending order. You have the option to adjust them once your trade is live and you are monitoring market conditions. While they are not obligatory when opening a new position, it’s highly advisable to use them to safeguard your positions.
Adding Stop Loss and Take Profit Levels
The most straightforward method for incorporating Stop Loss (SL) and Take Profit (TP) levels to your existing position involves using a trade line on the chart. You can achieve this by merely dragging the trade line to a specific level either upwards or downwards.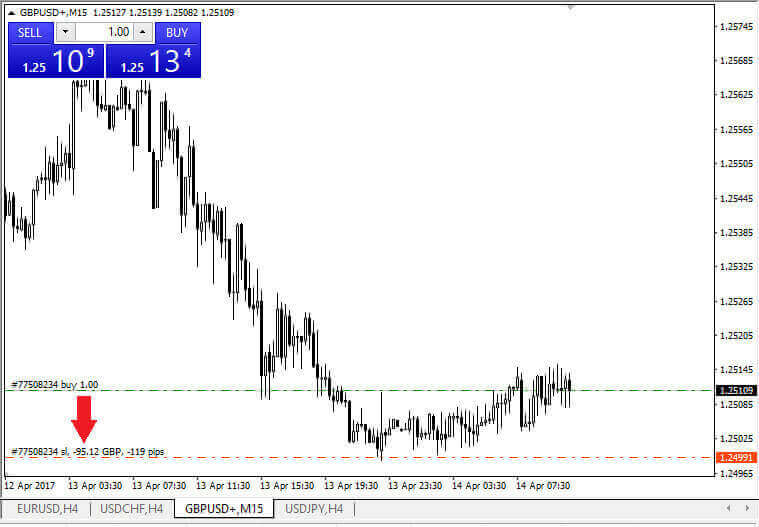
After inputting your Stop Loss (SL) and Take Profit (TP) levels, the corresponding SL/TP lines will become visible on the chart. This feature allows for easy and efficient adjustments to the SL/TP levels.
You can also perform these actions using the "Terminal" module at the bottom of the platform. To add or modify SL/TP levels, you can right-click on your open position or pending order and select the "Modify/ Delete order" option.
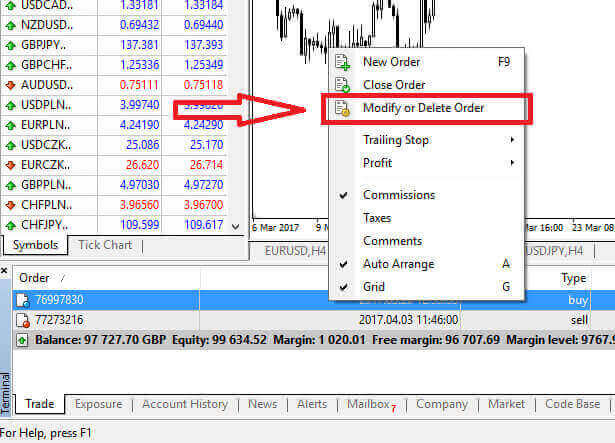
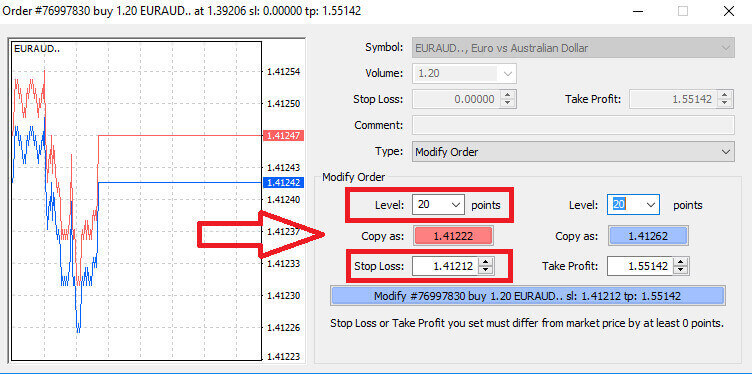
The order modification window will open, giving you the ability to input or adjust your Stop Loss (SL) and Take Profit (TP) levels either by specifying the exact market price or by defining the point range from the current market price.
Trailing Stop
Stop Loss orders are primarily used to limit potential losses when the market moves against your position, but they also offer a clever way to secure your profits. This concept may initially seem counterintuitive, but it’s quite straightforward.
Imagine you’ve entered a long position, and the market is currently moving in your favor, resulting in a profitable trade. Your original Stop Loss, initially set below your entry price, can now be adjusted to your entry price (to break even) or even above it (to lock in a profit).
For an automated approach to this process, a Trailing Stop comes in handy. This tool is invaluable for effective risk management, especially in situations where prices fluctuate rapidly or when you’re unable to constantly monitor the market.
With a Trailing Stop in place, as soon as your position becomes profitable, it will automatically track the market price, preserving the established distance between them.
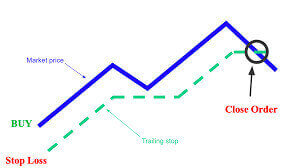
In line with the previous example, it’s crucial to understand that your trade must already be in a sufficiently profitable position for the Trailing Stop to move above your entry price to secure your profit.
Trailing Stops (TS) are linked to your active positions, and it’s essential to note that for a Trailing Stop on MT4 to function correctly, you must keep the trading platform open.
To configure a Trailing Stop, simply right-click on your open position in the "Terminal" window and indicate your preferred pip value as the gap between the Take Profit level and the current market price in the Trailing Stop menu.
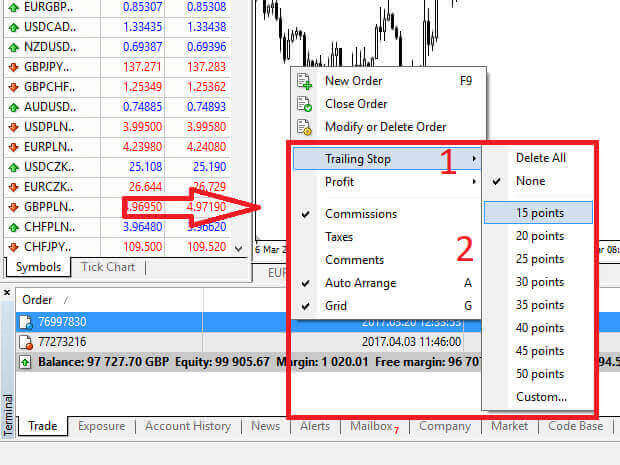
Your Trailing Stop is now active, meaning that if prices move in a profitable direction, the Trailing Stop will automatically adjust the stop loss level to follow the price.
To deactivate your Trailing Stop, you can simply select "None" in the Trailing Stop menu. If you wish to disable it across all open positions, you can choose "Delete All".
As you can observe, MT4 offers various methods to safeguard your positions swiftly.
It’s important to note that while Stop Loss orders are a highly effective means of managing risk and limiting potential losses, they do not offer absolute security. While they are free and provide protection against adverse market movements, they cannot guarantee your position under all circumstances. In cases of sudden market volatility or price gaps beyond your stop level (when the market jumps from one price to the next without trading at the levels in between), your position may be closed at a less favorable level than initially specified. This phenomenon is known as price slippage.
For enhanced security against slippage, you can opt for guaranteed stop losses, which ensure that your position is closed at the specified Stop Loss level, even if the market moves against you. Guaranteed stop losses are available at no additional cost with a basic account.
LiteFinance: Your Gateway to Forex Excellence – Register Today, Trade Tomorrow!
In the realm of Forex trading, LiteFinance emerges as the beacon of opportunity, seamlessly connecting aspiring traders to the world of financial possibilities. The registration process is not just a formality; it’s the key to unlocking a world of currency exchange and investment potential. LiteFinance, with its user-friendly registration process, sets the stage for traders to embark on a journey where every registration paves the way for informed and strategic trading. Registering at LiteFinance is not just about creating an account; it’s about stepping into a realm where your financial ambitions find fertile ground to grow. Trade Forex with LiteFinance — where registration meets the beginning of your trading success story.